Endangered Skill 8: Making Do With What You Have

Much of what we have talked about in this series of Eight Endangered Skills can be summed up with the phrase “making do”. It means using what you have to meet your needs. When the people we know as the pioneers made their way across this country in covered wagons, they built their homes in places where there were no stores, and the neighbors were miles away. All they had was what they brought with them in that wagon, and what they could get from the land around them. They had to make do with what was available to them. Learning how to do that was often a matter of life and death.

Those lessons were passed down to their children, and in many cases, forgotten when life got easier. Many of our our grandparents and great-grandparents relearned them from living through the Great Depression. Again, those lessons have largely been forgotten. We really need to work on reeducating ourselves.

Today, for most of us, especially here in America, it is pretty easy to just go buy what we need. Even if we can’t get it today, we’ll be able to on pay day, right? Well, what if we couldn’t? What if there was no money to go to the store, and there wasn’t going to be any soon? Worse yet, what if there was no store to go to even if we had money? Then what do we do? Well, no, we’re not living that scenario now, and we may not any time soon, but I wouldn’t want to wait until we are, to figure out what I might need to do to survive.

While money is available, at its simplest, making do means spending frugally, and living within your means. Don’t spend what you don’t have. Get out of debt and stay out. If you don’t NEED it, don’t buy it. Just in case some of you need a refresher on needs and wants, let’s put it this way: You need to eat, you don’t need to eat ice cream. You may want to eat ice cream, but you don’t need it. Seriously think about your wants and needs. Do you need new shoes now, or do you just want a new pair. Can you fix what you have? If not then by all means, go buy it, but be a smart shopper and look for real value. That might even mean spending a little more for something that will last a lot longer. Buy the best you can afford, but make sure you can afford it. Buying “cheap” can really cost in the long run. There is an old saying that goes “you get what you pay for”, and it’s true.

Closely related to spending frugally is to take good care of what you have. Make sure you eat that healthy food that you bought. Having to throw out food because it spoiled before we ate it is super frustrating for me. It’s like pouring money down the drain, or into the compost pile. Buy the best food you can afford, or better yet, learn to grow it, preserve it and cook it yourself. Yes, that might mean spending some money initially, but you will save much more in the long run. Take good care of your belongings. Put tools away when you’re finished with them instead of leaving them somewhere where they might be lost, or ruined (like out in the yard where they can be rained on or run over!). I could go on and on, but I’m sure you get the idea.

Let me stop here and say that Ed and I are just as guilty as anyone else about this. We try to be good stewards of what God’s given us, but we don’t always succeed. When we don’t, we try to learn from our mistakes and do better next time. We still have a long way to go, but we’re working on it.

One of Ed’s favorite phrases that he picked up in the Army is “improvise, adapt, and overcome”. That is the next part of making do. If you don’t have it, and can’t buy it, you need to use what you have. Many cooks know how to make “emergency substitutions” of missing ingredients. How do you make substitutions for other ingredients you might not have? You use ingredients you do have. You can learn to substitute what you don’t have with something you do in just about any situation. One of my friends told me once about someone using the soles of old shoes to replace broken hinges on a screen door.

My dad says that when he needs something, he makes it. What he is saying is that when he can’t get what he needs, he makes something that will work from what he already has. In order for that to work though, he must have stuff to work with. You have no idea how much stuff he has , but we’ll get to that in a bit.

In order to make do with what you have, you need to have something to make do with. So, the first thing you need to do is think before you throw something away. Ask yourself if that item might be used for some other purpose. If it might, hang on to it. Now before some of you freak out on me, I’m not suggesting that you never throw anything away. There are some things that need to be thrown out, but probably not near as much as you might think. We live in a throw away society, and it’s to our detriment.

Yes, you can take keeping stuff to the extreme. (You can take anything to an unhealthy extreme). I have to make myself purge my supply of junk on occasion before it takes over the house, the garage and the barn, but the thing is that when I need to improvise, I can usually find something that will work. My grandpa (Mom’s dad) was the same way, and he went overboard with what he kept, but he was very, very good at improvising.

There are many advantages to this type of making do. One is that we save money.  Another is that we learn to be creative. Once you start exercising that creative muscle, you’ll be amazed at how well you can improvise. A third is that we start to be appreciative of what we have.  The more we appreciate what we have, the less we need something more.

In addition to hanging onto some “trash”, you also need to think about learning how to repair what breaks, instead of throwing it away and buying a new one. We’ve already talked about this in another endangered skills post.  This also includes learning how to darn socks, sew on buttons, patch clothes, etc. Then when those clothes really do wear out, you can use the rags for other purposes, like rag dolls, rag rugs, or just cleaning rags.

IMG_0664

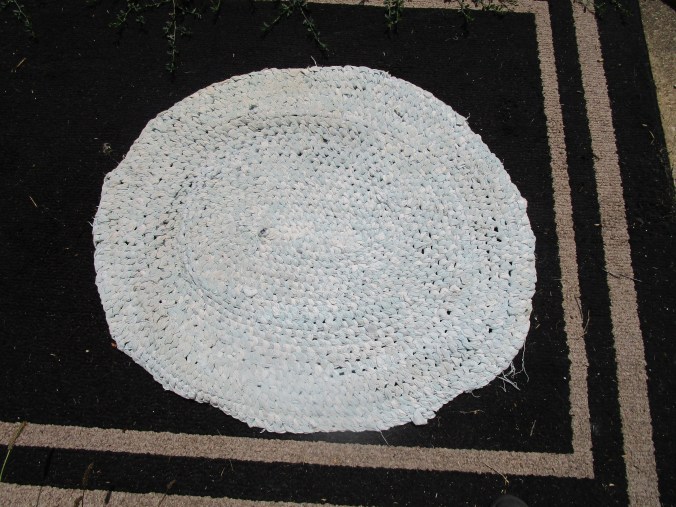
Last winter I made this rag rug for Bam Bam’s room in the basement. It’s made from old flannel sheets, and it’s great for keeping his feet off that cold basement floor.

You could even take it further and learn about appliances and electronics. Not only might you be able to repair things yourself, you could gain an understanding of how the parts work together, and what else might work instead. Bam Bam is really good at that. If you have an aptitude for that kind of thing, you might even build yourself a side business from it. Bartering is always a good way to make do. You trade something you have, or a skill you posses for something you need.

Back to my dad. He was on his own, for the most part, from the time he was about 13, and he learned early how to make do with what he had. Still functionally illiterate, everything he has learned came by watching, listening, and asking questions. He repaired shoes, dug ditches, ran construction equipment and built silos. For many years he worked in what he calls “salvage and demolition”. He and his partner tore down old buildings by hand. Sometimes, he was told he could have whatever was left in the building. In addition to that, he brought home anything from the building that was salvageable. Any time he sees something on the side of the road, he brings it home. He rebuilt an entire house from salvaged materials, and sold it. Last summer, Ed, Chicken Girl and I went to visit my dad in Georgia. It was the first time I had been there in 20 years. It hadn’t really changed that much, there was just more stuff.

He has a workshop down the hill from the house, and then he has other storage buildings that for the most part, aren’t buildings. They are things people wanted rid of, and he was happy to take them off their hands.

IMG_0074

This picture was taken from the car port near the house. The house down the hill is actually Dad’s workshop.  This is the tip of the iceberg.

IMG_0079

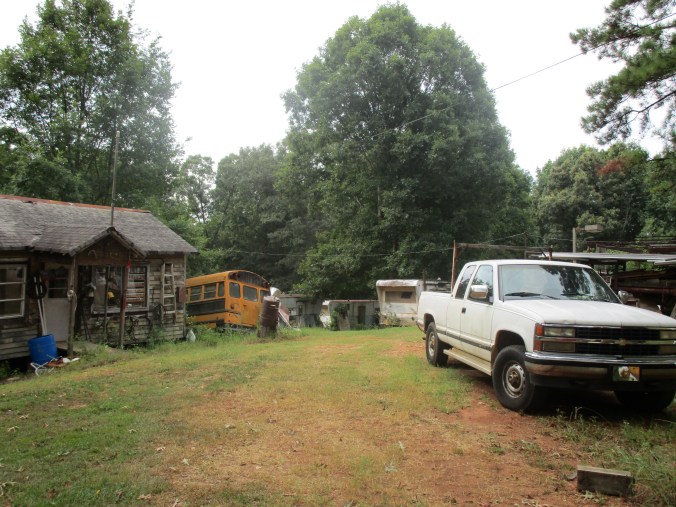
Closer to the work shop. Past the school bus, you can see some trailers. I’ts all used for storage

I took a lot of video. This is just a small sample so you can get the idea. My editing skills aren’t the greatest, and this is a free version of editing software, so, like I said earlier, you get what you pay for. The first part of the video is inside his workshop, the last part is inside one of this many containers. This one has hardware. He has others with antiques, light fixtures, electronics, books, lumber and probably just about anything else you can imagine. I mainly wanted to show you some of the things he has made. Oh, and Dad’s language can be a little coarse so, just be forewarned.

Yeah Dad is the extreme. If you think it’s overwhelming in the video, you should see it in person. I don’t know if you could hear the video all that well, especially in his workshop where the monster fan was running, but everything he showed us, he found either inside a building he was tearing down, in the trash by the side of the road, or someone gave it to him. He keeps it all. If the right buyer comes along, he sells it. If not, he just keeps it until he can make use of it. Oh, and every building on the place has it’s own hammer, screwdriver, pliers, etc., just in case he needs it.

For the rest of us, making do is really a mind set. You have to change how you think. Challenge yourself. How many ways can you make do? Let us know in the comments here, or on our Facebook page.

Connie

Other posts in the Endangered Skills series

Endangered Skill #1: Shoe Repair

Endangered Skill #2: Black Smith

Endangered Skill #3: Small Appliance Repair

Endangered Skill #4: Reading the Weather

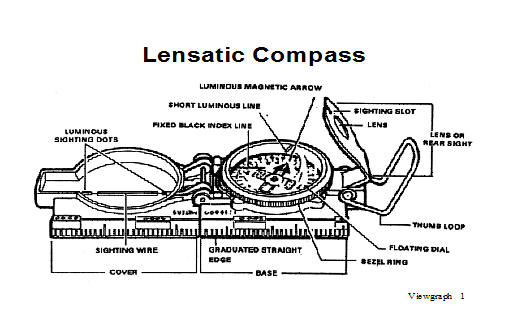
Endangered Skills Number 5: Orienteering Part 1

Endangered Skills Number 5: Orienteering Part 2

Endangered Skill #6: Foraging

Endangered Skill 7: Making Your Own Entertainment, Part 1, Musical Instruments

Endangered Skill #7 Making Your Own Entertainment, part 2: Homemade Toys

Endangered Skill 7: Making Your Own Entertainment, Part 1, Musical Instruments

When I did the original post for Eight Endangered Skills, I listed making and playing your own instruments, and then said it also reminded me of making toys. The point is that our ancestors knew how to entertain themselves, and they learned to have fun with whatever was available. That may be the skill that is truly endangered.  Today’s post will focus on music, but we’ll look at toys and other forms of home made entertainment in a future post.

Music is universal. Yes, styles vary by era, by culture and by personal taste, but it is there nevertheless.  People have made and played their own instruments as far back as we can remember. In the Bible, musicians are first mentioned in Genesis chapter 4. “ His brother’s name was Jubal; he was the father of all those who play the lyre and pipe” (vs 22).  The one instrument we all carry with us, whether we use it or not, is the human voice.

I was hoping Ed would write this post, since he did most of the work,  but his job schedule has changed a little, and we are still adjusting. When we started working on this series last summer, I found this article from Mother Earth News.  I knew that we had to try and build a gut bucket, aka washtub bass.  We would need a wash tub, something for the neck, something for the string (a plastic coated cable was recommended),  and a way to attach the string to the wash tub.

I will admit that I kind of struggled with giving up my old washtub, but I have been promised a new one. Ed found an old closet rod for the neck and asked if I had any tin cans that we could cut the bottoms out of for washers. Was he kidding? Of course I did!  We did have to go buy eye bolts and a small cable.  After we got home, we both saw a cable we could have used, and I am quite sure eye bolts will turn up too.  We learned a long time ago, that the best way to find something you know you have is to go buy a new one.   Once we got started, the whole process took less than an hour.   I have to tell you that Ed had a great time making this.

Chicken Girl was the photographer today.

IMG_0614

hole drilled in the bottom of the tub

IMG_0619

Inside of the tub with the “washer” and the nut end of the eyebolt

IMG_0616

Eye bolt on the outside of the tub

IMG_0622

attaching a ring to the eyebolt

IMG_0613

A notch cut in one end of the rod

IMG_0598

A hold drilled in the other end

IMG_0620

cutting the hook off the cable 

IMG_0625

The cable attached. Notice the notch on the rod hooked on the rim of the tub

IMG_0628

attaching the other end of the cable to the other end of the rod

IMG_0634

The finished product

Most home made instruments don’t need anywhere near that kind of time or construction. Have you ever given a small child a pot and a spoon? Yep, instant drum!  Different surfaces and different materials make different sounds and lend themselves to all sorts of “instruments”.  Dried beans in a tin can?   Maracas!  A comb and tissue paper? A kazoo!  Glasses filled with different levels of water? Chimes! The possibilities are probably endless, limited only by imagination. The best thing is that you don’t have to be a “musician”. You can just have fun with it.

You can buy specially made musical spoons today, they didn’t start out that way.   Ed actually got some pretty good rhythm going for awhile with two spoons from our kitchen.

Musical saws can also be purchased, but you don’t need a special one to learn. You do however, need something to use for a bow.  Chicken girl was greatly concerned when I experimented with an old hand saw and her violin bow.  I did manage to get a little sound, but probably needed a more flexible saw. The bow was no worse for the wear.
This is a basic tutorial on playing the saw, and Wikihow has instructions for making a bow here.

IMG_0637 (2)

Well, something like that anyway

Several years ago, Ed and I started collecting primitive instruments.  We used to play music at a couple different places and we liked to hand them out to whoever was there listening, and invite them to play along. We never got too many takers, but we did have fun, which was the whole point.

In addition to our usual  instruments (guitar, mandolin, harmonica, etc), we have a washboard, a jug, a cowbell, and now, a gut bucket!  IMG_0638

Do you play an instrument? Have you ever made your own?

Connie

Endangered Skill #6: Foraging

Foraging generally means finding food that is growing wild. In an emergency situation, being aware of what grows wild where you live, and how those things can be used for food and first aid could be a matter of life and death.  Even in everyday circumstances, that same knowledge can save you money on groceries. Usually you can find food growing wild your yard. You probably call it weeds.

My dad hates “greens” of any kind, because (he says) they had to eat so much of it when he was a kid. He grew up poor and his family ate wild greens a lot. He particularly detests dandelion greens. Yes, I have picked and eaten raw dandelion greens. To me, they don’t really taste any different than other greens that you might buy in the grocery store. I’ve also fried dandelion blossoms. Chicken Girl wasn’t impressed, but Ed and I liked them.  One note about wild greens: if you’re picking them to eat raw, the best time is early springs when the leaves are small and tender.

I think I may have told you this before, but several years ago, when we still lived in Independence, I had the opportunity to attend a Wild Edibles workshop at the Burr Oak Conservation Center. The ladies running the workshop called themselves the “Wild Ones”. I think the youngest of those ladies was probably in her 50’s, but the oldest was somewhere around 80 years old. Her name was Frances Matthews, and there is a great article in the Missouri Conservationist about her, the Wild Ones and wild edibles. You can read it here. The day I attended the workshop, they taught us about different kinds of wild edible plants, and we got to taste some things like dandelion jelly, wood sorrel tea and stuffed yucca  and daylily blossoms.  (Chicken Girl really likes daylilly blossoms. Be sure to remove the stamen, pistils etc, from the center of any blossom before eating.)

Since then, I feel like I’ve learned quite a bit about plants that grow in the wild, especially the ones that most of us call “weeds”, but I know that I still have a lot to learn. When I started working on this post, I remembered I had written a few other posts about foraging, so I decided to refresh my memory before I went any further. I’m glad I did. I had written more about it than I thought. If you want to see my other posts that have foraging info, find “Foraging” in the Categories list to your right. I have written about Goldenrod, Mallow, Mullein, Queen Anne’s Lace, Chicory, and my all time favorite, Plantain.

Over the last three years, I’ve learned about a few new plants found on our place. I showed you pictures of wild grapes a few weeks ago. Along the same fence row as the grape vines, we have wild roses. I noticed what looked like berries on the roses, did a little research and discovered rose hips.

Rose hips are the fruit of the rose plant. Most of the time we don’t see them because people dead head their roses. That means they pull off the spent blossoms, which encourages more flowers to grow. It also prevents hips from forming. From what I read, rose hips are harvested after the first frost of the fall, and then can be used either fresh or dried.

“Gather fruits (hips) as they ripen in autumn (after frost) or during winter, wash and remove dried persistent flower parts from top of hips, then split open and remove seeds. Eat pulpy portion fresh or in jellies or sauces. Dry whole or half cleaned fruits  for later use (soak overnight in warm water), or finely grate or grind dried hips to yeild a slightly fragrant powder rich in vitamin C and essential minerals. Sprinkle on hot cerials or use to make hot tea. Also wash young leaves, cut into small pieces and dry for hot rose tea. Flower petals can be used in candy, tea, and jellies, but fruits are more nutritious.” (“Edible Wild Plants: A North American Field Guide to over 200 Natural Foods” by Thomas Elias and Peter A. Dykeman, pp 220-221)

They’re supposed to be good for inflammation too.*

In the spring we had Pineapple Weed growing down the center of our driveway. I just noticed the other day that it’s gone for the year and I never did get any of it. It is so named because, when you crush the leaves, they really do smell like pineapple.

The flowers and leaves are edible. You can get more details about Pineapple Weed and many other wild edibles at Wild Edible food.com.

There are so many wild growing plants that are edible and/or have medicinal value, we have just barely scratched the surface. We haven’t even talked about wild mushrooms and other edible fungus, mainly because I don’t know enough about it to share. It’s on my “to learn” list though.

To pick up this “endangered skill”, you need to learn about the wild edibles in your area. There are all kinds of online resources, like this one , but be sure to get a good hard copy field guide like the one cited above too.  That way you have something to carry with you for those times when the internet is not available. Also, make sure the areas from which you gather have not been sprayed with chemicals designed to kill weeds.

Happy wild edible hunting!

Connie

*Disclaimer: We are not medical professionals. All the information posted here is for educational purposes only and is not intended as, or to replace medical advice.

Endangered Skills Number 5: Orienteering Part 2

IMG_0044

This is the map of our local area. The big city of Braymer, Missouri is the pinkish spot in the upper right (north east) quadrant.

When I was promoted into the ranks of a Non-commissioned Officer in our United States Army these many years ago, this newly formed Buck Sergeant was taken aside and taught the first absolute of being a good Sergeant. A crusty Platoon Sergeant with a marked Spanish accent said, “Sergeant, you will NEVER let a 2d Lieutenant hold the map and the compass at the same time.”

Land Navigation, as the Military calls it, is a vital skill and it starts with understanding what you are dealing with. I am not going to have the time or the space to teach you how to navigate using a map and a compass, the best I can do is list the skills necessary to navigate with a map and a compass. Perhaps I can also highlight some common errors people make.

For more in-depth information I am going to refer you to Field Manual (FM) 3-25.26 Map Reading and Land Navigation.

Also, for good cheap or even free Topographical Maps I suggest you look up the United States Dept of the Interior Geological Survey. These are the kind of maps that, when I say “map” I am talking about.

1. A compass is a device that points to magnetic north. For the purpose of using a map there are THREE different norths:

a. Magnetic north is governed by the magnetic pull of the earth that draws your compass needle towards it. It is located generally around Hudson Bay but it moves.

b. True north is the actual point of north. The Top of the World if you will.

c. Grid north is where your map’s grid lines point to as north.

At the bottom of any good map there should be some kind of declination diagram or at least a pointer that points to true north. On short trips the difference between true north and magnetic north should not cause you much error. In Missouri the declination is 1degree 6 minutes east which I determined by visiting this site.  This means that, to adjust to true north I am going to have to subtract 1.6 from my compass heading.

Are we confused yet?

Let’s talk about compasses. I prefer the Lensatic Compass that is issued by the military, because it is accurate and designed for use in the worst kind of conditions. However, any decent magnetic compass will do as long as you know how to use it.

lensatic compass

U S Army Illustration

The compass on your watch band, in your fancy survival watch, the handle of your knife or the one you got out of a cereal box is probably OK for determining general direction, and it is better than nothing in a pinch, but I would not like to walk twenty-five miles using that type of compass to choose my direction.

2. Lets talk about maps for a minute. For my purposes, I am talking about a to scale two dimensional representation of a three dimensional surface of the earth. (I can remember that definition from twenty years ago but I cannot remember where I left my hat. Sigh)

That kind of map is a topographic map which shows elevations, vegetation, bodies of water, and man made objects. Anything less is going to give you problems choosing a good route.

So we have our map in our hands and our compass hanging by a lanyard around our neck. Lets talk about one of the major errors we all tend to make when trying to read a map. I named this error “The North Seeking Jeep”.

People have a tendency to believe that once they lay the map out, the top of the map (representing north) is oriented to the north. So people sitting in their jeeps (yes, I mean officers), have a tendency to believe whatever direction their jeep is facing is north. It probably isn’t.

To orient your map you can use your compass or you can use major linear terrain features you can see (roads, creeks, mountain ranges, power lines etc). The best way is with your compass. Factoring in your declination laying your compass along a north-south grid line and turn the map with the compass until the compass point to north. Until you know how your map relates to the cardinal directions, you better get used to long useless walks. By the way, Connie pointed out some people might not know what I mean by “cardinal directions”. Due North, South, East and West are your cardinal directions. Red birds have nothing to do with it.

There will be symbols and colors on your map. If you are using a Topographic Map from the Geological Survey folks, the symbols and colors are largely standard, but on any map they should be listed at the bottom of the map. Also you will find your contour intervals (the distance in elevation between contour lines) and your scale.

So we have our map. We have read it so we know what the different symbols and colors mean. We know the scale of the map and we have oriented it using our compass, after accounting for the declination, and we are ready to go.

Hold on a second. How far are you going to go, and how will you know how far you have gone? You can use the features on your map to estimate how far you have gone, but sometimes there is not that much difference in terrain features over an extended distance; deserts and plains for example. Now you need a method of measuring how far you have gone, and to do that you need to know your pace count.

In a military patrol two men are assigned to keep up with their pace. Generally they use a piece of para chord tied to their web gear in which they tie a knot every 100 meters. You may not need to use this technique where you are orienteering, but when you do need to use it, you need it badly.

So mark off a hundred meters over terrain, not down a flat highway, and find out your pace count. A true pace is a full two steps. If you step off with your left foot the second time your left foot hits the ground is one pace. My step is generally around 30 inches, and my pace count always came out to about 65 paces per 100 meters.

Oh, one last thing you will need to know. How to find places on your map using the grid system on the map and, in a pinch, the longitude and latitude system. I could try to explain it to you here, but I doubt either one of us have the patience for that. Get the FM I suggested or any other good orienteering\book. Get a map, get a good compass, and prepare to get lost.

Of course you are going to get lost. We all get lost. Orienteering is being lost, interspersed with occasional clarity as to where you are. Kind of like life.

Endangered Skill #4: Reading the Weather

“I smell rain.”

I don’t know how old I was when I heard my grandma say those words, but I know I was immediately fascinated. It wasn’t raining. To my young eyes, it didn’t look like it was going to rain. What did she mean? I sniffed the air. I smelled something different, something I still can’t describe. I call it “rain”, and it usually means we’re going to get wet.

I probably would have smelled it this week, if I had spent any significant time outside. In two days, we got about five inches of rain.

Weather is important to everyone. These days most of us can get weather information from TV, radio, and the internet. We can watch the radar and get instant information about what is happening right now, and what we might expect next.

That being said, have you ever noticed how often the predictions are off a little? How about dead wrong? Did you ever hear about the lady who called the local weather man to ask him why she was sweeping six inches of “partly cloudy” off her front porch?

Have you ever been some place where it was raining on one side of the street and dry on the other? People on both sides of the street listened to the same weather forecast. One side will say the forecast was right, the other will say it was wrong. The Economist has an interesting post about the subject of weather forecasting accuracy.

So, if our professionals have trouble predicting the weather, what are the rest of us supposed to do? Further more, what did our ancestors do before there were professionals as we know them today?

Well, there are some things, like smelling rain, that seem to be at least as reliable as our local meteorologist. One of the reasons we listed reading the weather as an endangered skill is because it’s one of those things for which we rely so much on technology, we forget to use our own senses. We just need to get our heads out of our cell phones and pay attention.

The first volume of the Foxfire series, simply called “The Foxfire Book”, has a chapter called “Weather Signs”. At first glance, you might think you are reading a bunch of old wives tales, and some of them might be, but not all. Here are a few samples from page 208:

“Forecasting Winter By Animals
It will be a bad winter if:
squirrels begin gathering nuts early (middle or late September)
muskrat houses are built big.
beaver lodges have more logs.
the north side of a beaver dam is more covered with sticks than the south.
squirrels’ tails grow bushier.
fur and hair on animals such as horses, sheep, mules, cows and dogs is thicker than usual.
the fur on the bottom of a rabbits foot is thicker.
cows’ hooves break off earlier.”
And the list goes on for three pages, and includes methods for predicting other types of weather as well.

Chicken Girl’s dad grew up in a logging family in rural Kentucky. Once, when we lived there, I noticed the leaves on some of the trees had turned upside down, showing their undersides. I mentioned it to him, and he said the trees were expecting rain.  I’ve seen it bear out more often than not. You can notice it from a distance, because the underside of leaves are usually a different, more subdued color.

Dad has lived in Georgia since 1970, and he has told me many times, when the weather is coming straight across (meaning out of the west), it won’t be that bad, but if I comes up from the Gulf, (out of the southwest), “we’re going to get it.”

Dad also says to gauge what kind of winter you’re going to have, look at horses and cows. If the winter is going to be a bad one, they will “coat up”. That means their hair will get thick and woolly-looking. Sounds like one of those “signs” from The Foxfire Book, doesn’t it? I’ve actually noticed this looking at livestock while riding down the road, and on our own dogs, particularly Libby.

I’ll bet you’ve heard this before:

“Red sky at night, sailor delight.
Red sky at morning, sailor take warning.”

Dust and water vapor particles in the atmosphere indicate weather conditions. The amount of each also determine the colors we see at sunrise and sunset. For a further explanation of that and some other good information for understanding your local weather patterns, look at this post from How to Provide for Your Family. In it, the author mentions that leaves turn over when the wind is coming from an unusual direction. Could that also be an indicator of rain? I don’t know, but it might be interesting to find out.

The post also mentions that the high humidity/low pressure combination that signifies a cold front, and often precipitation, can produce bodily aches and pains, as well as “antisocial behavior”. Ed and I can both attest to the bodily aches and pains part. As for antisocial behavior, I do know that people seem to get testy when the weather is hot and humid.

Weather has always fascinated me, and I love thunderstorms, but I’ll be honest. My mind just will not grasp the science part of it. I don’t know why, and it’s a little irritating, because I have to keep researching the same information. To quote Chicken Girl, “It just doesn’t stick”.

In other homestead news:

My camera had an accident and is out of commission. If I can’t fix it, which I probably can’t since that is way beyond my skill set, I will have to get another one. In the meanwhile, I got the gorgeous pictures you see in this post from Unsplash.com.

Adora, our injured cat is still recovering. Last Saturday, she came running when she heard me open the back door. A few hours later, she left a dead bird on the front porch. Unfortunately, Wednesday morning, I noticed her left hip looked swollen and it was hot to the touch. I called the vet, and we made another trip to his office. He said it looked like it was an abscess, but it was going to need to come to a head before he could do anything with it. In the meanwhile, he gave us some liquid antibiotic to give her. Either that will make it go away completely, or help bring it to a head so that he can lance it. While we were there, I told them that Chicken Girl though she had found more bites on the back of her head, so they shaved it to get a better look. They confirmed the bite marks, but said they looked ok for now.

With all the rain,we renamed the holes the dogs dug in their pen “Lake Libby”. However, after rain stopped, and the water soaked into the  ground, we discovered most of the holes had filled in. Now they can dig them all out again.

Ed broke down and bought another push mower. He managed to get the front yard mowed before the deluge hit. That’s a start, anyway. We wont talk about the fifteen foot high ragweed that has buried the burn pile and our wheelbarrow.

Connie

Other posts in the Endangered Skills series:

Eight Endangered Skills
Endangered Skill #1: Shoe Repair
Endangered Skill #2: Black Smith
Endangered Skill #3: Small Appliance Repair

Endangered Skill #3: Small Appliance Repair

My dad tells stories about his older brother taking apart toasters, blenders, etc, putting them back together and having them work better, even with a few “leftover” parts. I’m not sure if that’s completely accurate, but I do know that my uncle was really good at fixing things. My dad isn’t too shabby at it either. He’s good at making what he needs out of what he has too, but that’s another blog post.

As a kid and young adult, I remember visiting repair shops where toasters, blenders, and other small appliances were repaired. Sometimes those places fixed TV’s and VCR’s too. I haven’t seen a place like that in a long time. I did an internet search to see if any of those places still exist. A few do, like this one that, at least for awhile, had a blog too.

I found one repair shop that seems to deal with large appliances, but had advice for small appliance repair. They said “Most small appliance repairs are simple so many people generally try and fix them instead of calling a repair person”. You can read the rest of that article here.

I don’t know that most people really do try and fix it themselves. I think they throw it away and buy a new one, because that’s how most of us do things now. That’s what I did for a long time. Sometimes I still do it. Sometimes things aren’t designed to be fixed either, but that’s another blog post too.

My next stop was YouTube. I’ve been part of at least two discussions in the last few weeks where someone said, “You can learn how to do anything on Youtube!” I don’t know if that’s true, but I know that Ed and I both have learned how to do things by using YouTube videos.  I use it as a home school supplement too. I will offer one little piece of advice about that, however. You might want to look at a few different videos, because the one you start with may leave out an important step, (or loosen bolts/screws ahead of time) and not tell you.

Anyway, I searched YouTube for “small appliance repair” and found some great tutorials. I really liked Adam DIY, and watched several of his videos.

I tried to insert his “how to repair a broken toaster” video here, but it keeps showing up as “how to clean a table saw blade”.   I tried another video on his channel, and it did the same.  The table saw video is the first one on the list, and for some reason that is the only one that will play embedded here. Here is the link to the toaster video.

This video from comeinhandynow, is good too, but it’s dealing with a more complicated problem.

Have you ever tried to fix a small appliance?

How did it turn out? Let us know in the comments below.

Connie

Endangered Skill #2: Black Smith

I don’t know about you, but when I think about a blacksmith, I see a sweat soaked, soot covered man wielding a hammer. I think of him as someone from the past, as most of us probably do.  My research brought some nice surprises. Blacksmithing is alive and well! The knowledge is still out there, if you want to get it.

So, what exactly is a blacksmith?

According to the American Heritage dictionary, a blacksmith is:

1. One that forges and shapes iron with an anvil and hammer.
2. One that makes, repairs, and fits horseshoes.

Foxfire 5 has an entire section on Iron Making and Black Smithing. It includes drawings and pictures of furnaces, as well as explanations of the difference between wrought iron, pig iron, and steel. Of course, in true Foxfire style, there are the interviews with “old timers” who have inside information on the relevant subject.

“A blacksmith forges objects of metal typically wrought iron or steel. To forge metal is to shape it, by heating then hammering, or pressing it into the desired form.” Foxfire 5, pg 112

“At that time the blacksmith played a vital role in his community and was generally accorded his respect. There is hardly a facet of life his work did not touch upon; indeed without his skills , the prevailing life-style would have been extremely primitive. Most of the items a blacksmith made and repaired were either tools or other work related items, such as harness fittings and ox yokes. In a culture where everyone, even children had to work just to get by, it’s not hard to understand how important the blacksmith was.” Foxfire 5, pg 108.

The book goes into great detail about what a blacksmith does, the tools he uses, and the importance of proper care of tools and equipment.

“On the subject of tools, Leo Tippett said, ‘My father took good care of his tools. He never threw them down in the dirt, or on a rock. They’s scarce. My daddy’d give me a going over if I throwed a tool down in the dirt or rock. And I’m glad he did. You have to respect tools. Good sharp tools are the name of the game’” Foxfire 5, pg. 112

That comment, in itself, says a lot about how attitudes have changed.

Don’t know about Foxfire books? Ed wrote about them here.  It took us awhile, but we finally got the full set.

The blacksmith was important to a community because he made much needed tools and equipment. Today, much of what he did is manufactured in factories and shipped to stores where we buy it. One video I watched said the local smithy has been replaced by Lowe’s and Home Depot.

A partial list of things the blacksmith made is also listed in Foxfire five on pages129-131. Included are the things we normally think of, like horseshoes and axes, but we also find knitting needles, shoe buttons, nails and screws.

According to Simon Grant Jones, the passing of the time when horses were commonly used for work and travel spelled the end of the “traditional country smithy”. Simon is a practicing blacksmith, so take some time to explore his site. Another interesting historical fact he mentions is that often, at the end of the day, embers from the smithy were taken to the bread ovens to bake bread. Talk about members of a community working together!

Once again, I went to YouTube to see what I could find about Blacksmithing. I found a lot! The best one though, was this treasure.  Love that he had kids learning in the shop, not to mention the techie.

If you decide to try and learn yourself, let us know how it goes.

Connie

Endangered Skill #1: Shoe Repair

We need shoes. Many of us don’t want shoes, but we have resigned ourselves to the necessity. We don’t want to be barefoot outside when it’s 10 degrees and snowing. Others, like the infamous Imelda Marcos, and my Grandma Elvera, want shoes for every occasion. Grandma had to have matching belts too, but that’s another story.

Shoes used to be made by hand. One of my favorite fairy tales is the one about the Shoemaker and the Elves. In the story, a poor shoemaker has only enough leather to make one more pair of shoes. He carefully cuts out the leather pieces, and leaves them out over night, intending to sew them the next morning. When he awakens, he finds the shoes already finished. You can read the rest of the story here.

Just out of curiosity, I got on YouTube and entered “shoe makers” in the search box. There were 89,30 results! Maybe shoe making and shoe repair are not as endangered as we thought. Still, they are not nearly as common as they used to be, and if the skill isn’t passed along, it could be lost in a generation. This is a nice video from the Victoria and Albert museum showing the making of a pair of shoes.

Most of us do not buy our shoes from the shoe maker. We get them at Walmart, or Payless, or some similar store. When they wear out, we go buy a new pair. Most of our shoes are mass produced, and the manufacturers don’t intend for us to get them repaired when they wear out. They expect us to buy more.

That’s not to say that you can’t find well made shoes that last; you can, but you will have to pay more than many of us can reasonably afford. Every day shoes used to cost more, relative to the income of the time, and people wanted them to last as long as possible. That’s why most towns had shoe repair, or cobbler, shops. Shoe repair shops do still exist, but often, the cost of fixing a pair of shoes may be more than the shoes are worth.

That doesn’t mean that we shouldn’t repair our shoes when we can, especially, if its a job we can do ourselves. So, no I have never repaired my own shoes, but I do wear them until there is nothing left. I’m hard to fit, so when I find a pair that does, I want to keep it as long as possible.

IMG_1959 (2)

One of the two pairs of combat boots I was issued when I entered basic training in 1981. I was supposed to switch back and forth between the two pairs, but I didn’t. This pair used to be kept highly spit shined and on display. The other pair is long gone. I would still wear these, but my calves are too fat now!  No, those are not the original laces.

When I was in the Army, back in the early 80’s, I bought a pair of cowboy boots at the Post Exchange. I paid fifty dollars for them. For me, at the time, that was a lot of money. I loved those boots, and I kept them for probably eight years. The only reason they lasted that long was because my dad fixed them every time I went to see him. Both boots were resoled and reheeled, and he even stitched the faux leather, in the back of the ankle, where it had worn through. I wore them all the time. They were like an old friend. I hated to give them up, but finally, there was nothing left to fix. There is probably a picture of them somewhere. If I find one, I’ll post it on our Facebook page.

Another YouTube search, this time for “shoe repair”, brought 353,000 results. Many of those were made by professional cobblers, so I searched “DIY shoe repair”: 376,000 results. This was the first result. I have to admit, I like this guy!

Even if you don’t want to go through all that, take a look at the other tutorials available. The next time I have a pair of shoes that need mending, I’m going to see what I can do. I’ll let you know how it turns out.

In the meanwhile, you can always try making your own shoes. This was Ed’s first attempt at making moccasins for me a few years ago. Not bad for a first attempt, and I know he learned some things in the process. He really needs to get back into that. Oh, the beadwork was mine. I needed more practice too!

IMG_1961

The moccasins Ed made for me.


I guess the thing is to keep trying.

Connie