Things To DO When It’s Too Cold To Do Things: Fixin’ My Guitar

I have a fairly low tolerance for self-pity, especially when it is my own self-pity. So, other than feeling sorry for myself about the loss of the bees what have I been up to this winter? For one thing I have been teaching myself to fix my musical instruments with a long term plan.

At some point I intend to fully rebuild this old Kay that I have stuck back in a closet. The model number indicates it was built sometime in the late fifties to early sixties. It is a solid guitar but it seems to have suffered some mistreatment. So expect to see some posts on this one down the road a bit.

What started me on wanting to fix guitars? Money and time mostly. A while back, with much groaning and gnashing of teeth, I replaced the saddle on my thirty-six year old Applause guitar.

Applause

This time started when my Epiphone strap pen and pick-up jack were loose. I could drive to Independence and back home, and that equals about three hours time and about ten bucks worth of gas. The estimate from the Luther for tightening the strap pen and pick-up jack was about thirty-five bucks.

What I ended up doing was watch two videos on You Tube; about half an hour, no charge. Then I bought two quarter inch dowels I need to do the repair. Repair time was about an hour and cost was under two bucks, and I got an extra dowel. (Old Army thing, if you have to have one take two with you.) The boost to self-confidence and renewed interest in DIY stuff? Priceless.

So lets look at what is involved:

Step one: Get the instrument seated on a firm surface that will allow you to work in good light and not scratch or dent the instrument. My Hummingbird is a little over two years old and has only got one memory mark on it. I try.

What you see is nothing but a side work table to my desk with two towels. It works just great.

Step two: Firmly insert your dowel into the pick up jack. The first time I tried to fix this I supposed that I could reach in when I changed strings and just tighten her right up. Yes siree Bob, just tighten that rascal right up. Note to self, the human arm don’t bend that-a-way. So you seat that dowel in the pickup hole firmly.

IMG_1014

Make certain the dowel is firmly in place. You do not want to be fishing for this thing.


Step three: Take loose the cover that also is your strap pin. Move it back on the dowel.


Another note: I do not remove any of the hardware from the dowel. I leave it there until it is time to put the thing back together because I am not fond of the where is the INSERT NAME OF LOST TINY THING YOU CANNOT DO WITHOUT HERE game.

Step four: Push the dowel up into the guitar until you are under the sound hole. You will be able to see and reach the hole amplifier jack assembly. You do not have to remove the strings.

IMG_1007

Step five: You will see another small nut on the jack and two more washers. How much you need to tighten the nut depends on how loose the jack and pin assembly were. I wish I could be more specific but it will be a matter of trial and error. When you think you have it right, carefully pull the dowel with your amplifier jack assembly on it out of the hole at the end of the guitar. Once again, you do not want to loose that jack inside the guitar or you will have to go fetch it.

IMG_0999

So there it is, the strap pin is tightened and seated. The jack is flush with the outside of the strap pin. On top is all the tools I got out of which I used the needle nose pliers, the 3/8 wrench and one dowel.

What we are trying to do is tighten that nut until the whole assembly firmly seats into the hole prepared for it with the portion that the strap pen screws on sticking out and the rest even. You have finished you hope.

Is the whole assembly tight when wiggled? When you look at the assembly is the tip of the pick up jack even with the strap pen that closes and covers the assembly? It should not be recessed or protruding.

Of course if you have access to an amplifier,  you will pull out your chord and test it even if you do not normally play over amp. Because why? Because Mommy potty trained you with a ball bat just like me.

Happy playing pickers.

Bye Bye Bees

So where have I been? Frustrated, angry at myself, and feeling like a rank failure. Oh, did I mention feeling sorry for myself? Yeah. There is that. The last I spoke to you folks about my bees, I had three healthy hives that were going like gangbusters. I had harvested enough honey to pay for the purchase of one nuc I made last year, and everything was going well.

About ten days passed as I did other things, and then I revisited the hives. Two were just gone. I mean empty. I opened the hives and found signs of wax moths, and I thought that was the problem. However, I am wondering about that now and I will speak about it later.

First, I checked the third hive, which was a good three to four hundred meters from those two. It appeared to be fine, showing no signs of problems at that point. I even pulled the lid while not wearing my bee gear to look. They seemed happy and healthy. more about that later.

When I opened the two empty hives I had my second surprise. There were not very many dead bees on the bottom board. No more than a dozen which is about what I might find if I had disassembled a healthy hive. So where did they go? I think “go” might be the operative word here. These bees were not killed; they seem to have just left.

bbbs2

Why I think they just left. Ten days ago at most these were FULL of honey.

This was in late September. I kept a close eye on my final hive, and changed the top board for winter. Then the worst winter I have seen since we moved to Braymer hit us. Early in October we had a freeze that set down on us for over a week. When I checked on the final hive, the bees were dead. Not gone like the first two: dead. There was good honey and no real sign of hive beetles or wax moths. Just dead.

It was the freeze, I was not the only bee keeper in the area to lose hives to this freeze. It just happened it was my last hive. And, for me at that time, the last straw. I was heart sick, guilty, angry at myself, nature in general and, yes to some extent, God. Aside here; it is OK to get angry at God. If you read th psalms David was angry at God more than once. Just as long as you do as David did and try to end your rant with “Thy Will Be Done”. Even if you have to say it through clinched teeth. Oh, did I mention feeling sorry for myself? Yeah, that too.

bbbs3

The other hive with Wax Moths I immediately disassembled and put all the parts in a freezer for over a week. This one was waiting for freezer space and I made certain nothing was getting out until I took care of it.

Things I said to my loving wife, Connie, at the time included but were not limited to, “I liked living with a farmer but never particularly liked farming.” “There is a difference between wanting to raise bees and being able to.” Cut off about five yards of that kind of material and you got the idea. Frankly, somebody probably should have given me some fruit and cheese to go with that whine.

So that is where I entered the winter. I froze all my equipment for a week, some with nature’s help. Then I went inside and tried to figure out what I was going to do about the bees. I cannot afford to buy more bees at this time. That is still where I am at today. Am I going to try to get back in the bee keeping business? If so how? I have a lead on the possibility of some wild bees and there appears to be two hives who absconded right here on the place I might could trap.

So what is God trying to tell me about the bees? Is the message, “Ed, bee keeping is not your thing.” Or is it, “Suck it up buttercup and drive on because you have not failed until you quit.”

Seriously, right now I still do not know the answer, but spring is finally beginning to break. There will be another day unless all the snowfall and the present rain doesn’t drown us all.

So I will go outside, clean up some equipment, save what I can and decide. Do I sell it, or try again? We will talk in a week or so.


Pistol Pack People (The Sidearm)

My previous looks at firearms might have left you with the impression I am not very respectful of the great American icon, the pistol. If so, let me clarify, you are right. The only saving virtue of a sidearm is that you can strap it to your side and pull it out only when you need it. That is unlike a shotgun or a rifle, which is in your way and on your mind, until you can safe it and secure it somewhere.


flintlock pistol

Flintlock Pistol All of them were handmade this one was just too pretty.

With the advent of the flintlock, the sidearm became more practical. The original Flintlock pistols were single shot just like the rifles. The only multi-shots being multi-barreled. They were crude, heavy and simply for repelling boarders, meaning stopping targets at close range in a hurry, and as a back up when you emptied your one shot rifle or musket.

Pistols stayed this way for a couple centuries. Oh there were experimental designs of the Pepper Box multi-barrel type and some experiments with the revolver design but nothing really practical until a young sailor carved out a working single action revolver model from wood. That sailor’s name was Samuel Colt. Yeah, that Sam Colt.

patterson colt

Patterson Colt, The earliest successful adoption of Colt’s patten

So the first practical multi-shot pistol was the revolver as designed and adapted by Mr. Colt. It was a single action. Single action means every time you want to bring another round into battery to fire it, you must pull back on the hammer, which revolves the cylinder, cocks the hammer and re-sets the trigger. When the trigger is pulled, the hammer drops and ignites the primer, which fires the propellant and sends the bullet out the barrel.

The next advance in the pistol was the double action revolver. A double action revolver means that the trigger serves the function of cocking the firearm, bringing another round into battery, and releasing the hammer to fall and ignite the cartridge.

The next and, I would say final, true advance in handguns was the automatic (now called a semi-automatic by some) pistol. Experimental models were released in the 1890s but the automatic pistol came into general production with such models as the Mauser 04, Luger P08 and the Colt Model 1911 The numbers on both refer to their date of acceptance into military service as does the Browning M1935 the first really successful double action automatic pistol.

m1911

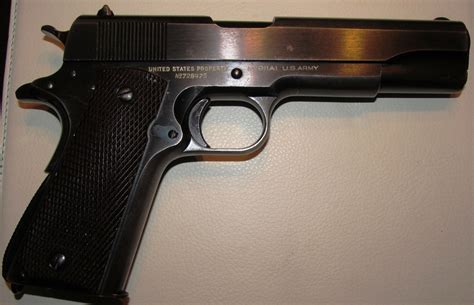
The M1911 Pistol Probably the greatest improvement in sidearm design since the revolving cylinder.

Automatics come in single action first shot, which means that you have to cock the hammer either by use of the slide or manually before firing the first shot then the firearm fires every time you pull the trigger. They also come in a double action first shot design which means as long as around is in the chamber all you have to do is pull the trigger.

The history lesson is over. Let’s start with the question of how do your really see yourself using this firearm?

Remember, at its very best and with you at your very best, a shot out to 50 meters (about 55 yards) is very hard and requires a lot of concentration and skill. So the pistol at its is  still best used for repelling boarders.

When I was in the business, the average police shooting was done at twelve feet, lasted less than two seconds with two and one half shots were fired total. (That includes both parties.) The TV long time, multi-shot, run and gun is a myth and like all myths it is mostly based on one or two truly legendary incidences.

IF, God forbid, you get in a pistol fight with an assailant the odds say you are going to be close enough to smell his body odor. That is if you were not already too distracted and scared to notice, because in less time than it takes to say this, it will be over and someone, maybe both someones, is going to be dead or injured. That is the reality of a pistol fight. So if you intend to have one you need a pistol that can win that kind of fight.

Back to questions you need to answer, “How much of your life are you wanting to commit to learning about, practicing with and maintaining a handgun?”

All firearms require fine motor skills but the handgun requires the most. The rifle is more forgiving of lack of practice and the shotgun is most forgiving by the nature of its round. Fine motor skills require the most practice. If you do not believe me ask the people I play guitar with.

All firearms require maintenance. Even weapons that have not been fired and are cased and covered need to be checked, wiped down and maintained on a regular basis. I would recommend once a month. The more complicated the firearm the more maintenance it is going to need. The amount of time you want to and are willing to invest in practice, care and up keep of your weapons is going to help dictate what type of weapons you need to keep.

Now I am going to name names, not to advertise for someone or to limit choices but to give you my “best of a type” that is available.

SINGLE ACTION REVOLVER: Largely there is only one name still making a modern single action revolver; that is Ruger. They make everything from a .22 caliber to a .44 magnum in all sizes and barrel lengths. The most intriguing entry they have is the Ruger Blackhawk .357 magnum convertible. This piece comes with a 9MM cylinder that will allow you to fire 9MM Parabellum bullet through it. Since the .357 can fire all types of .38 caliber cartridges this give you a very wide range of ammunition.

rugerb

Ruger Blackhawks in a variety of sizes and two calibers (357 and 44 Magnum)

Its positives are it is tough, easy to maintain, fairly easy to use and extremely accurate, if you need to play out around that 50 meter mark.

Its negatives are that you have to learn to manipulate hammer and trigger, and the fact it cost about seven hundred bucks last time I checked.

python

This is the Colt Python, it was retired by Colt in 2005 and is no longer in production. I just like to look at it and it is a primary example of the Double Action Revolver


DOUBLE ACTION REVOLVER: More choices here and in a wider price range. I actually had to check to see if Smith and Wesson was still in the revolver business. The answer is yes and they make a good one. Pricey, but good. Ruger also has a line of double action revolvers, again, high priced but excellently made. Taruis has also moved up in the revolver field, making clones of Smith and Wesson products and some of their own these days.

Caliber options in revolvers center around .38 caliber and .357 magnum. At the risk of one too many confusing caliber histories, the round named .38 Caliber in American revolvers is actually a .357 caliber. It seemed fair to round up. The 9MM Parabellum round? Oh that is exactly 38 caliber. Confused yet.

The take away from this little trivia lesson is that a .357 magnum can eat .38 Special rounds but the .38 special cannot eat the .357 magnum rounds. Knowing that, which one do you think I am going to recommend? Buy the .357 even if you intend to fire .38 special; it is more sturdy and gives you more options.

SINGLE ACTION AUTOMATICS: There is one design of the single action automatic still on the market. That is the venerable M1911A1 design. Buying a Colt made pistol requires a bit more cash than most would want to pay. Especially when Tarius, Springfield and Auto Ordnance all sell a version.

Positive: Strong design excellent safeties (three safeties on the pistol) good accuracy.

Negatives: Must cock the hammer on first shot and it’s heavy.

DOUBLE ACTION AUTOMATICS: Almost all of the newer designed autos are double action first shot. Chamber your round, lock the safety and carry. Deploy your pistol, take it off safe, pull the trigger. Simplistically, that is how they work.

Positives: Unless you train like a maniac, the DA Pistol is going to give you a quicker 1st shot.

Negatives: More moving parts means more parts to break and (I don’t care what others say) I think they are not as safe as the 1911 with a grip safety, half cock safety and full safety.

Then there is the Glock. Closer to the Double Action Auto, the Glock is its not quite this nor that. It is almost as easy to use as a revolver and gives you the higher capacity of an Auto-pistol.

Before I go on, a moment to talk about the lowly .22 caliber. Yes, it is under powered and too small to be your go-to combat pistol, but I still recommend that  if you intend to own firearms, you have a solid .22 caliber revolver to complement your rifle in that caliber. Why? If for no other reason if you do find yourself doing serious business with .22 caliber cartridges you want a lot available.

To summarize, I have said all that to say this:

If I were buying, I would probably look first for a solid .357 magnum revolver, and if you want a name, a Ruger GP 100 or a S&W Model 66

My sentiment would send me looking for a good Springfield or Auto Ordnance 1911, but this is not about sentiment is it.

My next practical choice would be a Glock, and I would likely go for the Model 17 9MM.

Other than the stroll down sentiment lane  for the great old 1911, my choices are practical for a person who wants something that hits, has some stopping power and something that is probably going to go bang every time you pull the trigger, even if you do not have the time, talent or inclination to baby it.

Since we have talked about combat situations and hunting,  I want to talk to you about over penetration. Over penetration is the simple fact that most bullets will penetrate THROUGH a soft skinned body, like a deer or a person.

Another great TV myth is the bullet that ONLY hits what you are aiming at, then stops dead in its tracks because its work is done. A .38 Special will fire a bullet completely through a 60 foot long Mobile Home unless it hits the fridge. That is what I mean by over penetration, and if the kinda sickly .38 or 9MM can do that, think what a .357 or .44 magnum can do.

For you hunters, that .300 Winchester Magnum or 30-30 will not just stop in your Mule Deer so you really want to know what is out there behind Bambi’s Dad for at least a mile, or until there is something big and thick in its way.

If you have one at all, having a good firearm is best. Having a good understanding of firearms is absolutely required. Owning a firearm is an exercise in freedom and, like all such exercises, it carries a load of responsibility.

When you pull the trigger it is YOUR bullet. What it hits is your responsibility.

God’s blessings,

Ed

Author’s note: Admission, a lot of my tone of derision for the sidearm is that of a spurned lover. I grew up on Cowboy movies and could spin and border shift my Fanner 50 when I was seven. To grow up and find out that my favorite firearm was the least effective in SAVE MY LIFE!! situations was kinda hard on a true believer.  But the sidearm does serve a legitimate purpose as a firearm you can have with you and concentrate on other things at a need.

The Rifle and the Carbine (Barks here and bites way over yonder)

The story comes down to us about a 19th Century Coroner’s Jury who declared a certain death a suicide. Thinking perhaps an explanation was in order, the Jury noted that the victim had attacked, with a pistol from fifty yards away, a man who was carrying a rifle.

The shotgun is the Utility Infielder of firearms, the Carbine is shortstop and the rifle plays all the way out to DEEP center field. The pistol should spend most its time riding the bench. A war story from my own past. I was a young soldier going through training with firearms and today we would learn about the venerable and legendary M1911 Colts .45 Caliber Automatic Pistol. Otherwise known as the .45 Automatic.

A Sergeant First Class Drill Sergeant sporting a Combat Infantryman’s Badge with a Star held up a forty-five and said the following, “If you find yourself in combat and this is all you have to fight with you are not having a good day.”

So what is a rifle and a carbine? Lets approach the carbine first since the rifle was an adaption of the original model. A carbine is a long barreled (normally more than eighteen inch) firearm. Many years ago such a firearm was referred to as a musket.

A carbine normally, but not necessarily, fires a lighter load than the rifle. However what really sets the two firearms apart is that the carbine’s barrel is not grooved, so the projectile (bullet) has a tendency to tumble after it leaves the barrel, making it less accurate at distances.

The M1 Carbine is an excellent example of this firearm at its best. Its advantages were that it is shorter and lighter than the rifle by the same designation. It’s disadvantage was that the carbine’s true effective range was under one-hundred fifty meters while the rifle’s effective range was easily five hundred and that limit really only depended on the skill of the shooter.

The carbine’s uses would be for those times when you need something with a bit more range and possibly a higher magazine capacity than a pistol, but you do not want to be lugging a full sized rifle about with you. Years ago, while living in Texas and spending time exploring old Ghost Towns and what not, an M1 Carbine resided behind the seat of my truck.

When the firearm was being refined in the 17th and 18th century, they were largely single shot muskets with a barrel as smooth as a water pipe. The best example of this musket was probably the Brown Bess used by the British Army for many years. While it was the best of the breed, it was horribly inaccurate.

In the fifteenth century in Germany, the process of creating a spin on the bullet by grooving the bore, the inside of the barrel, so that it would create a spin along the axis of the bullet making it much more accurate.

So why, if the rifled musket or rifle was that much more accurate, was the musket still in use for a couple centuries? Because the musket was easier to maintain and clean and quicker to load. Anyway, the average soldier was lucky to be able to hit the ground with his hat.

If the overall history of the rifle is something you would like to know more about check here.

What we want to discuss here is whether we need a rifle or a carbine, and if so what calibers? We do remember what calibers are right? Essentially 100th of a inch. Let’s start with Carbines. Carbines have largely lost favor with most folks, though the military does issue an M4 Carbine that came along after my time.

The advantages are lightness and compact size; the disadvantage is range. If you want a firearm to stuff behind a seat in your truck or keep in a survival Go Bag, a carbine would do nicely.

If you are going to do your hunting in the brush country of East Texas or my own Smokey Mountain Laurel thickets, a carbine is a great thing to have. If you intend to hunt in western Kansas, you are better off with a rifle.

A big part of the equation on rifles and carbines is types of actions and caliber of rounds. Let’s talk about those for a minute.

Actions:

Automatic, As long as you hold the trigger down it will keep on spitting bullets until it is empty. Of course these are not normally available to the general public, but let me tell you that even speaking as a former Infantryman, you really ain’t missing that much. On automatic an M16 will empty a 30 round magazine in less time than it takes to say, “My rifle is empty and I am standing here helpless.” If you really need quick fire that much I recommend the Semi-Auto.

AK47

AK 47

Semi-automatic, Every time you pull the trigger it fires a bullet. Take your strong hand hold it up and open and close your index finger as fast as you can. Now you should realize the sustained rate of fire on a semi-automatic firearm is really depending on your skill with the weapon because your finger can close really quick.

Advantages: Quick fire.

Disadvantages: Complex action, need for more cleaning and maintenance and, at certain calibers, recoil and control of the firearm.

ruger 1022

Ruger 10 22 Rifle One of the best 22 calibers on the market.

Lever Action: Ever watched a western movie? If not and you intend to now to see how a lever action works, I recommend the classic Winchester ’73 starring Gary Cooper. A lever action firearm has a lever beneath the stock and the fore-stock which opens the breach, ejects a shell and pulls another up and into battery for firing.

Advantages: Fairly quick if you practice. Mostly compact like the Winchester Model 94 30/30 that is sold all over the place. A good all around firing system.

Disadvantages: The action will become finicky and jam on you if not well maintained.

model94

Winchester Model 94

SIDE NOTE: For those who read my shotgun article, I neglected to mention that lever-action shotguns were made by Winchester and others years ago. The pump action was the better choice.

Bolt Action: If you are not familiar with bolt actions have you ever seen a door or a fence with a toggle type bolt that must be rotated and then pulled back? That is essentially how a bolt action works. I talked about them in my post on Shotguns.

boltac

Springfield Model 03 30.06 Rifle

Single Shot: This is what it says. Just like the single shot shotgun it breaks from the top and you hand load a round every time you fire. Some really good hunters enjoy these weapons because you pretty much have one chance to do the job.

Double Barrel: They do make double barrel rifles but they are rare. Mostly they were made for big game hunters years ago and can cost in the umpteen thousands of dollars. Unless you intend to hunt Elephants or F350 pick up trucks, it’s not really a weapon you need.

That largely covers how rifles work. Now lets talk about what they eat. Rifles come in a dizzying number of calibers from the Barrett .50 caliber, which fires a round designed to destroy lightly armored vehicles, to a relatively new entry in a .17 caliber for varmint hunting. Given enough time, I can find you an article on every one that swears you cannot live without it.

I once asked a noted survivalist, soldier, gunsmith and gun dealer this question. “If you could only have one rifle which caliber would you choose?”

He answered without hesitation. “A good Twenty-two caliber rifle.” I was shocked because I expected some high velocity small caliber wonder, or perhaps a medium sized super powered weapon,  or maybe some big old piece like the 440 Winchester. Nope, that same old .22 I had shot as a boy was his must have rifle.

A well made 22 caliber is tough, it is light and easy to carry, it has range and is as accurate as the person behind the rifle can make it. It also has a very small light bullet which means you can carry a few hundred for the same weight as a small box of .308 Winchester rounds, and in the field weight can be a big problem. Finally the .22 caliber round is perfectly capable of one shot kills on any soft skinned target in the United States, except the very large ones like bears, buffaloes and such.

So yes, I now agree with my friend from Texas. If you need a rifle, the first one you need is a .22 So what after that? I don’t know.  Again, what do you intend to do? Let me tell you what I believe you should NOT do.

Do not be seduced into buying the latest “man toy” just because its sexy. The price on M16/M15 clones is ridiculous. What are we looking at, upwards of $1500.00? I can buy a Mini 14 in the same caliber with what I believe to be better accuracy, and the same rate of fire for about half that, buy a 30/30 Marlin, and still have enough left over for that new 12 string guitar my wife says I don’t need.

Look to your needs, not your fantasies.

Next time I will talk about the handgun.

Ed

The Right To Keep and Arm Bears (I always love to say that!)

I have some reluctance in approaching this subject because there is a lot of controversy around it, and some folks will take offense just at talking about the subject. However, I am a retired Infantry Soldier I was also a Law Enforcement Officer for a number of years, and I was raised with firearms so I know a bit about them.

I want to take a moment to talk about firearms for the Homesteader. I will not address whether or not you should HAVE a firearm on your homestead. What I could give you is my opinion and we both have one of those. Think about it, do whatever research you need to, and then decide for yourself.

One thing that amazes me is the fact that so many people seem to believe knowledge of a subject is intrinsically evil. Why? When did ignorance become virtue? So you do not like firearms and think they are bad. You find one leaned against a tree. Is it safe? What kind is it? Is it even real? Where is the safety? How do you unload it and make it safe? Even if you have no intention of ever owning a firearm, let me suggest to you that learning about them could be a very good thing.

For the sake of this post, we are going to assume you are looking at purchasing the necessary firearms for your home. We will also assume that what you know about firearms could be written on the back of a matchbook with a big crayon.

First question: what do you see yourself doing with a firearm? Is it for hunting, defense from predators, defense from people, all of the above, or just because you want one?

Some, not me, tend to approach the subject along these lines. For hunting and protection from predators, you need:

A fairly large caliber rifle for deer; a varmint rifle with a small caliber with a lot of power behind it; a twenty-two caliber because who does not need a twenty-two; and a shotgun.

For home protection, you need to break the bank buying various pistols, revolvers, short rifles, fake machine pistols, defense modified shotguns, and specially manufactured high speed low drag, multi-colored do-hickies to hang off your thing-a-ma-bobs.

gahanwilson

If you cannot see it the caption reads “I think I won.” Thank you Mr. Gaham Willson

So here’s me. You want to fill all the needs we spoke of above. You do not want to devote your life and your fortune to the care and feeding of an assortment of what are essentially high-tech rock throwers. As the kids say, “I feel ya man.” (Do they still say that?)

Shotgun.

Open_1.jpg

The Hallmark Greeting of Firearm, when you care enough to send the very best.

That’s my answer. The venerable, multi-function scatter gun. If you want a firearm that, using assorted ammunition readily available in any sporting goods store and most Wal Marts, and that can efficiently and effectively take anything from a Quail to an Elephant, you want a shotgun.

Let me clarify that. Before I try to take a charging elephant with my 12 bore loaded with slugs, Mr. E is going to have to win the race. The fact is that with some skill, some nerve, and God on your side, a 12 Gauge slug will take an elephant at close range.

If your needs are simple home defense, defense against predators and hunting, there is no better choice than a shotgun. Loaded with the right sized shot it can do the job at short to moderate range.

Therein is the scatter gun’s shortcoming. It is a close in firearm that loses it’s effectiveness and accuracy quickly. So if you need to work much passed fifty meters, you might want to reach for something else.

But what kind of shotgun?

Shotguns come in some basic models:

Single shot or double barrel: This is your basic tube or tubes with a firing pin on one end and a hole in the other. They are loaded by breaking down the barrel(s) and inserting shells. The safety in most cases is located on the top of the stock, just at the back of the barrels.

singleshot

single shot


double

Double Barrel The Old “Two Shoot Gun”

Positives: They are absolutely simple with few moving parts. This simplicity means they are easy to learn to operate. Single shot guns are really cheap, doubles are not so much.

Negatives: You only have one or two shots depending on whether it is a single or a double. I have seen people who are superbly practiced, reload a single or double in the blink of an eye, but not many and not often.

Bolt: I do not believe anyone still makes these, but some are still out there if you are buying used. The fact they still are is some testament to their toughness. Normally, they are three shot pieces fed from an internal or separate magazine.

bolt

Bolt Action

Positives: Unless they are collector’s item age and quality, they are dirt cheap. Most were made for and sold by Sears, Montgomery Wards or even J C Penny’s back in the day. As stated above, they are tough and simple.

Negatives: First, these are old guns and in the best of shape they are still subjected to aging. Something I am made aware of myself whenever I try to get out of bed in the morning. Also, bolt guns are normally slower actions than some of the others.

Pump: A pump shotgun operates by pulling the fore stock (just under the barrel) back to open the breach expel the spent round, and forward to put a new round out of the magazine and into the chamber, cocking the weapon and bringing it back into battery. Most of them are actually five shot piece, but have been plugged to three so as to comply with state hunting laws.

pump

Pump Shotgun

Positives: They are a sturdy piece of simple design that can be fired as quickly as you can learn to operate the pump. Depending on the manufacturer, you are going to pay somewhere between two and five hundred dollars new. In today’s modern gun market that is dirt cheap.

Negatives: Seriously, hard to say. Properly cared for, and barring serious accident, one of these weapons will outlast you. They are simple, they are tough, they bark right here, bite HARD over yonder. Can’t asked much more of a firearm.

Okay, lets play a little word game. When you are talking about rifles and carbines, automatic means you pull the trigger and hold it down and the piece will fire itself empty. When you are talking about Shotguns and Pistols, automatic means that it automatically chambers the next round, re-cocks the hammer and returns to battery so you have to pull the trigger every time you fire it.

Why? Originally all weapons which automatically cocked were called automatics, then Mr. Thompson, Mr. Browning and a few others introduced rifles and carbines that automatically fired. Those became known as Automatic Rifles while Shotguns and Pistols stayed as they were.

Automatic: Automatic shotguns will fire a shell every time you pull the trigger until it is empty. Normally they will hold 5 shells but are plugged to three.

auto

Automatic, Browning to be exact

Positives: They are really quick and, in the right hands, accurate. A well made one is fairly sturdy and will last, if maintained well.

Negatives: That “right hands” part above. Most time the man is not up to the weapon. An old adage, “When you try to do it too fast you only get to be half-fast.” (Say that real quick) Also I find them to be harder to keep functioning under rough conditions. Finally they are higher than a Bernie Rally in Denver.

You might get a sense that I am biased towards the pump gun. That would be true. Maybe it’s because the Trench Shotguns we trained on in the Army were pump, and the Shotguns we used in Law Enforcement were pump, but yes. I do prefer the pump shotgun and that is what I own.

But that also leads to a second and final bit of advice that can be applied to everything. When its REALLY important you are probably best served to stay with what “brung you to the dance”. Learn new things when the farm ain’t on the line.

Next time I write to you I will continue this talk on firearms. As I said, if all you want is a simple and cheap way to fit all those needs, a shotgun is your baby. But some of us might have other needs like more range or simple carry.

Next time I think we should discuss rifles and carbines. Oh, I have a short set of definitions for some of the words you found in this article. If you have other questions on words and meanings I will be happy to try to help.

SHORT SIMPLE GLOSSARY:

parts

Caliber or Calibre: Approximately 1/100th of an inch making a .50 caliber bullet about a half inch in diameter. This is somewhat deceiving because of tradition and the naming of bullet sizes from years ago. For instance a .38 caliber pistol actually shots a bullet which is .357 inches. The tradition dates back to the black powder cap and ball pistols.

Gauge: The exact definition of wire gauge is a little hard to put down in a few words. You are welcome to look it up but suffice it to say that a 12 gauge barrel is about .729 inches in diameter and the slug for that barrel would be slightly smaller.  As the gauge number increase the size decreases. A 16 gauge is smaller than a 12 and a 20 smaller than a 16 and so on.

Rifle: A shoulder fired, long barreled firearm which has groves around the inside of the barrel which force the bullet to spin as it leaves the barrel which increases accuracy and range.

Shotgun: A shoulder fired long barreled firearm designed to fire multiple projectiles from a shell at the same time.

Shotgun shell: Now metal and plastic but at one time metal and paper, a shot gun shell is designed to hold the primer and the powder charge and a number of small BB or ball bearing type balls which are fired from the barrel.

Shotgun Slug: A shell with a one piece slug inside the size of the barrel designed for shooting soft skin, larger game like dear and black bear.

So with all that said, see you next time and God Bless,

Ed


Swarm Trapping

If you were raised “up in ‘dem hills” as I was, you are familiar with traps; leg traps, snares, box traps (rabbit gums or boxes). Later on, I learned about Quick Kill traps when trying to catch beavers. Someday I might do a post on the subject, though I am not involved in it at present.

I want to talk about Swarm Trapping.

In my last post I talked about the life cycle of a hive. If the hive thrives, there will come a point where there is a swarm. This is how bee hives multiply. So what we are looking at is not like trapping say, Muskrats, because your aim is not to end up with a pelt, but with a hive producing honey and bees for you. So we are going to set out to lure the swarming bees into our new home for them. If there is any relationship to pelt or meat trapping, it would be to the rabbit box or gum if you will.

RabbitGum-23

Basic picture of a Rabbit Trap or Rabbit Gum

A little disclaimer here, I have never actually done this. I plan to set my first traps next spring, so I am kind of using you guys for a sounding board to see how my research has gone, and if my plans hold water.

So here goes. What is a Swarm Trap? A Swarm Trap is a box. For the sake of reference, it has about the internal dimensions of a deep hive box, which is a little over 43 liters or 1.5 to 2 square feet. My original plan was to use my two old school Nuc Boxes for my initial traps, but they are only 1.2 square feet internal dimension. I need to do so some more research to see if that will work. If not, I will use a spare deep box or build my own.

beetrap

This is a Swarm Trap as sold by Crooked Hill Beekeeping

If you intend to build a swarm trap, you need to know more than I can put in this short blog post. I would suggest that you do some online research. I found an interesting article on the subject here. I may decide just to buy a couple, My friend Bill George, at Crooked Hill Beekeeping, will sell one he made for about thirty-five bucks last time I checked.

One thing I have heard from everyone is the more your Swarm Trap smells like bees, the more likely you are to have success with it. If you start with a newly built trap you will need to add some propolis and wax to the inside along with some Lemon Grass Oil which mimics the smell of a queen.

Once you have your traps ready then you need to put them up in a tree or trees. There is a reason that most plans for swarm traps are taller and thinner than the normal shape of a large hive box. This type of box is easier to carry under one arm and easier to secure in the crotch of a limb, with some tie down straps or ropes. The traps and the tie downs must be able to stand up to severe weather. Expect them to be there awhile, and have to endure thunderstorms and other bad weather, and still be in the tree when you get back.

At some point, we hope the scouts for a swarm prepared hive will find our swarm trap, go inside through about a two square inch opening, and find everything warm and dry with the smell of bee’s wax and propolis. We expect them to find around 2 square feet of space and maybe some frames to give them something to work with. Then we want them to go back and tell the potential swarm what they have found, and lead the Queen and all her little flying subjects to our Swarm Trap.

Checking our traps at least every third week, we hope to find bees inhabiting our swarm trap and happily building up their new hive. Then we would need to get our ladder, go back up the tree, close the entrance to our trap, get it down from the tree. I think we might be needing a length of rope and maybe even a small pulley set up at this point. I do not relish attempting to climb down a ladder carrying a box of rather perturbed bees under one arm. Once we get them back home I would suggest we let them settle in for a couple of days before making the final transfer into a regular 10 or 8 frame hive box.

As I have said many times before, and now remind you, I am learning on the go and trying to share what I learned.  I suggest that you read the article I referenced earlier in this blog post not only for how to make swarm traps and trap wild bees but also about natural beekeeping and its overall positive effects on the environment. Next year I am going to move to some more natural methods of beekeeping that are mentioned in this article and try to help reestablish a more healthy honey bee population in this area.

This is the end of the series of posts about how to increase your number of hives. On that subject, I have a lead on an old house that is “slap full” of bees. The man who told me about them said that they could not get near them during the summer. If everything works out and I can get permission from the owner I will try to go get them in the spring.

Another aside: If you raise bees, two of your greatest enemies are hive beetles and wax moths. The good news is they are controllable and they are fairly easy to trap. With the hive beetle,s you set the traps in the hive to catch them using a hive beetle trap, which will also catch the larvae of the wax moths.

IMG_0654

This is the Hive Beetle Traps we use. They are inexpensive and, if you ask those dead beetles in there, they are effective.

However, for the adult moths you set your traps outside the hive in the surrounding trees. You can look this up on line, but these traps can be built as simply as using a plastic coke bottle. When I finish one, I will post a picture.

Here is the recipe for bait for both kinds of traps. I made it and accidentally left an open container sitting on the work bench in my garage overnight. The next afternoon I found it and it was full of moths. Yeah, it seems to work pretty well.

½ cup apple cider vinegar.

¼ cup of sugar.

1 cup of water

1 ripe banana peel diced fine.

Mix the ingredients in a closed container (I used a pint fruit jar) and let ferment for 3 week. Strain out the banana peels and set up your traps.

Ed

Fifty/Fifty Making the Split

A short, very simplistic, primer on the life of a bee hive:

Step One: Bees come from somewhere: swarm, bought or split and begin making a hive.

Step Two: Queen does a mating flight and begins making baby bees (called brood) and we hope a whole bunch of them.

Step Three: All the bees work together to fill the hive space with brood and food and lots of bees.

IMG_0658

Not yet ready for splitting but a pretty good example of a healthy hive headed in that direction.

Step Four: Oops we got too many bees.

Step Five: If they have not already bees begin making Queen Cells.

Step Six: New Queen is born, old Queen take about half the hive and moves out, this is called a swarm.

Step Seven: See step one.

And that is how bees increase, ask somebody else about birds.

So today I am going to talk for a little while about how bee keepers control this natural cycle to make certain they keep their bees. It is called Swarm Management and Hive Splitting. The point is to catch the hive somewhere around Step Four and intervene before the Swarm Instinct has taken hold. Then you artificially split the hive so as to make two hives out of it.

We have a hive and man ain’t we proud of it. This hive is strong, well populated, clean and busy as…. well….. bees. You may be weeks or even days from a swarm. Bee hives reproduce themselves by swarming. It is a natural occurrence in a strong hive that is growing. Sooner or later part of the hive will break off, move and reestablish itself as a separate hive. What we want to do is control that instinct by moving them ourselves before the Swarm Instinct kicks in because once the girls start the process they will get it done.

If you want to be technical there are several viable ways to split hives. So far I have tried and succeeded at one way and that is what I am going to talk about. A disclaimer. Succeeded is defined as, they were alive and doing well day before yesterday when I looked. If all my writing on the subject has taught you or me nothing else it is that things can happen very fast in bee world.

If you want more information on Swarm Management and Splitting Hives I suggest you read starting on page 69 in your copy of First Lessons In Beekeeping or check out this.

We had one hive out of two make it through the winter. That was my goal for year one and this was year two. No plan survives initial contact. But I was happy about it and, further, the hive was strong and well populated. In May, after some discussion and research we split the hive. There are other ways and I will probably try a few of them if given an opportunity next spring but here is what we did.

First, we isolated the laying Queen for a little over a week. We did this by putting a Queen Excluder between the two deep hive boxes. It does not really matter whether Her Majesty is working in the top or the bottom box because now we have her where she can only lay in one box. By finding the box with uncapped brood in it we find where the Lady is laying.

queenex

This is a Queen Excluder. Her Highness is bigger than the other bees and this keeps her on one side of the excluder.

When we checked we found two good things, there was uncapped brood in the bottom box which meant she was there, and there were Queen Cells in the top box. Russian bees have a habit of keeping “just in case” queen cells ready. If the queen is still viable she will not let them hatch. If not, or if it is time to swarm, she will. So we took the top box, placed it on a bottom, put a top piece on it, closed the front and we had the start of a new hive.

Next step, we separated the split from the original hive by about four miles. Two would have done nicely but four was the best we could do over two miles. Why two miles? A bee can travel up to a mile an a half from her hive, find something she wants like pollen, water or maybe her old hive, go back to where she came from and communicate these directions to her hive mates. Yeah, me too. That’s amazing. I worked with U. S. Army trained Reconnaissance Scouts who could not tell you the way to the latrine.

So we got the ladies more than two miles away and set them up in a pasture with already blooming clover, plenty of nearby water and other blooming plants all about. Then we waited. The split hive needed to stay away from the original hive at least two weeks. During that time I visited every couple of days and checked the feeders and the general condition of the bees. Both them and the original hive seemed to be doing well.

Lets talk Queens. You can buy a Queen and place her in your split hive. That will cut your delay on getting fresh brood by one to two weeks. What we did was just split them and let nature take its course. Depending on whether you have Queen Cells in your split and what condition they are in the delay to get a new Queen is going to be one to a little over two weeks. Then you have a one week delay while she is bred. Then you have a two week delay until your brood begins to hatch.

That is why it is important to have capped brood in your split and that is why your split will be behind your original hive no matter what you do. We got less than half the honey out of our split as we did the original but they had made and do have plenty for winter.

Oh, an oddity. Russian bees are normally pretty calm and not the least aggressive compared to most bees. For whatever reason these ladies are kind of “‘ttudenal” and will sting you right now. Hopefully they will get over it but I swear they are still mad at me about the split.

Ed

Wild About Wild Bees Part 3

So we are at the last of a three part series on our taking a bee hive out of an abandon house adventure. Let me give you the big spoiler. Before the end of summer we lost the hive to wax moths. What are wax moths you ask? This tells you better than I can.

IMG_0810

This is what brood comb looks like after a visit from wax moth larvae.

Essentially they are a moth whose larvae burrows through the wax and eats the pollen and brood destroying the hive. A strong hive can control and defeat wax moths and there in lay our problem. When we brought the bees home, we likely brought the wax moths with us. We also reduced the bee population, caused a break in the birth cycle of the bees, and led to a situation where the moths could overcome the weakened hive.

Another time in my life where I learned from my mistakes, but another suffered for them. I always regret that, but at least it is even more motivation to not make the same mistake again. So let me do an after action review and tell you what we will do differently next time the opportunity presents itself.

I will do a reconnaissance of the site before we go out to it. This is another one of those things where I did not transfer general experience from my past into a new thing I am doing in the present. I KNOW that, given an opportunity, you do not go into an unknown situation without first seeing the objective. Had I done that, I would have had a much better idea of what I had to bring.

I will obtain and take a vacuum cleaner with adjustable suction with me and, if available, with battery power. This would have been essential to gather up even half of the bees present.

I will take more hive boxes than I believe I need. I thought I did that this time, but I was way over matched on equipment to transport the bees.

I will start earlier in the day. First because I have learned that bees are more docile early in the morning or late in the evening, and second for the sake of coolness.

Since this is short I will end with a little photo essay of our last couple visits to the girls. We came away with about thirty pounds of honey from one hive but the other two, who got a later start, have not capped everything else so I will check them again next week.

The reasons the other two hives, though strong, are behind is that they started with less, being a new hive and a split, and this awful drought we have suffered.

We are getting to the point where we are going to have to prep for winter so next week will be the dead line.

IMG_0742

I have always loved honey in the comb. To do that you have to set the frame up without any foundation in it. You insert a couple of Popsicle sticks in the groves where the foundation goes and stick them with wax. The bees do the rest. I did one frame a hive.

IMG_0745

One of the reasons my no foundation frame did not work last year was Her Highness got up in the Super and laid brood in it. What you are looking at is a Queen Excluder.  Because Milady is bigger than the other bees she cannot fit through.

IMG_0746

This is interesting. In one of the deeps I guess I forgot to put in a frame. Think that stopped the girls? No way, they just made comb and honey anyway.

IMG_0760

BEES!!! I do not believe the ladies are very happy with me.

IMG_0757

That look of pain on my face has nothing to do with the bees except their added weight. A deep hive box full of brood and honey is HEAVY.  Did I mention how old I am?

Ed


Wild about Wild Bees: Part Two of Three Parts

So the last we spoke, Connie and I were beginning to, for the first time, try to pull wild bees out of the walls of a dilapidated old house that was soon to be torn down. You can find all that here.

The house was lathe and plaster walled and there was no electricity in it. Good luck as much as good planning, my sawzal was battery powered, and yes I had brought extra batteries. But where, exactly are the bees? I had proven that they were as far down the wall as two foot or so from the floor and as far up the wall as at least six feet. What about side to side.

IMG_0491

This is the wall I will be working with. In the video you will see a two foot wide swath cut out from floor to ceiling and all of it full of hive.

As we faced the wall, to the left was limited by the window sill and the necessary framing that would go with it. From prior experience, I knew most houses were framed at two feet on center. Experimentally I went looking for some framing at two feet from the window and found a two by four there.

Now I had a box that went from at least the ceiling to the floor and was two feet wide. That seemed like a natural place to find the hive so, between the two foot up and six feet up, I made a cut just inside and searching for the framing two by four. Once I found it I cut open a small area.

That was when I began to get a hint of how amazed I was about to be. I took my small pry bar and a hammer and began to pull back the lathe and plaster wall. There was no need to be overly neat because they were going to tear the house down anyway. First I went up from the two foot mark to the six foot.

Between the two by fours spaced two feet on center packed as deep as it could go and all of the four feet length there was hive. That would be about twenty inches wide and four inches deep by four feet long or about two and a quarter cubic feet of hive and brood just covered with bees.

That would be the ones that were not on me.

And that as not all of it. Over a period of time we uncovered up closer to the ceiling and  from the two foot point to about a foot under the floor. All of it was filled with hive starting with the oldest near the entrance hole and the newest nearer the ceiling. Here, let me see if I can show you:

I have a reaction when I come into close contact with God’s magnificent engineering and actions in nature or in man. First I am awed of course. Next I am strangely happy, almost childishly so. Some kind of “I just knew you were there God.” moment. Then I am simply humbled by the works of God. Add to that the fact that we were hopelessly over matched today.

So when you cannot do it all you do the best you can. Finding the Queen by any normal means would have be pretty near impossible, most of the comb was empty because it was early spring and there was very little honey.

Connie and I decided to get all the brood comb we could find and put that in the hive box which we had brought. Suddenly the bees began to quit attacking us and settled back into the comb with some coming and voluntarily landing in the box. We gathered as much as we could, sealed the box and put it in the truck.

Nine countable stings and one box of bees with way too many left behind, we were on the way home. Already we, both of us being veterans, were A. A. R’ing the whole thing. (After Action Reviewing). As we rode home and drank water. We both agreed we would do better next time.

In part three I will talk about our AAR and the ultimate outcome of our first attempt. If any apiarist who have something add reads this, please feel free to critique me in comments. I have had my faults explained to me by Drill Sergeants, you will not hurt my feelings and you may help me and the bees next time.


Wild about Wild Bees Part One of Three Parts

A friend contacted me about a friend of his who was tearing down a house that was full of wild honey bees. Did I want to try to get them out?

Time and money are limited commodities. Let me promise you that I have much more time than money. So when I am offered the opportunity to put together a bee hive for a little bit of work, I am right there to do it.

I said, “Absolutely”. Then set out to learn how to do it. The first rule of learning anything new is that it is never as simple as you might believe. The second rule is that it is never as complicated as those who are trying to tell you how to do it make it out to be.

When I learn about electricity I really do not know it until I get shocked. Probably more than once. Most of my life has been fly by the seat of my pants experience and, beside the seat getting a little threadbare, I see no reason to stop now.

So what did I do?

1. I contacted people who knew something about what I was going to do to ask for their advice. Never turn down free advice, it is at least worth what you paid for it. What I learned from this is that you are essentially pulling the hive, comb, brood, honey (if any) and bees out and taking it with you. Easier said than done. One piece of advice I ignored was to use a vacuum with a variable or low setting to gather up the bees. I will do that next time.

One thing I learned which made me delay the whole procedure was not to try moving a hive too early in the spring because they were still weak from winter so I talked to the owner and he agreed to wait about a month.

Also, I learned that pulling a hive of bees out of a dwelling or tree has a pretty low success rate even for experienced beekeepers.

2. I read about it. The two reference books I reach for most are First Lessons in Beekeeping by Keith S. Delaplane (in the tradition of C. D. Dadant’s 1917 original) and Homegrown Honey Bees by Alethea Morrison. There are others, that might be better, but these work for me.

3. Yes, I went on YouTube. Who doesn’t? If you find yourself needing to do kitchen table brain surgery I suggest you check YouTube. They probably have a video about that. So I watched the videos I could find and learned what I could.

There is an old military saying, “Amateurs study tactics and strategy while professionals study logistics.” That is because no matter how well you plan you must have what you need when you get there or you cannot complete the mission. So we checked and double checked what we took with us.

First, of course, something to put the bees in, I took one deep hive box and, just to be certain, a Nuc Box. Also, safety equipment for two people. Second, this was an old house so I would need to get into the wall that would require a saw (I took two; one battery operated sawzall and one  hand saw), two different styles of pry bar, and basic carpentry tools.

I did not know if I was going to go in from the outside or the inside. My “plan” was to work from the inside but the situation would dictate which way I went.

So Connie and I went over our list, tried to assure we had everything and I loaded the truck the night before because, military again, nobody ever gave me extra duty for getting there early.

The next morning we got in the truck and, thanks to Google, got there without any trouble. Here comes another old military adage referred to as Murphy’s First Law of Combat which says, “No plan survives initial contact with the enemy.”

The house was a very dilapidated old structure. My guess would be late 19th or early 20th century frame house with one and a half stories. Approaching the house, even in my two wheeled drive truck, was no issue because the owner had cut a rough track in with some form of tractor.

IMG_0481

Looks pretty rough right? That window back there is our only viable entrance. 

IMG_0482

Here is another view. Bet this was a really nice house back when I was a kid. 

After we got parked and before we prepared to approach the bees, we did a little reconnaissance around the house where we found an old hand pump well and, just up and right of it about two and a half feet up the outside of the house, the bee’s entrance. So, from the window above the well, the entrance was two feet left and two and a half feet up from the floor. Easy enough to find from the inside.

IMG_0484

That brown spot on the wall there, that is the bee’s entrance. Beside it is an old well pump and well which I am surprised Connie did not make me take with us. 

IMG_0483

The entrance when we got there. 

IMG_0485

Now it is cleared enough to get in and out and I am getting equipment inside. 

Next, we reconned the way in and out. We were looking at a floor strewn with junk, broken glass, old furniture, etc. Our entry was through a broken out window. More glass, more junk. So my next job was to make certain we had a clear path in and out as best I could because we were going to have to step over that window sill no matter what.

I did all this with Connie’s help and we still were not suited up for the bees because they seemed not very concerned about our human foolishness. Having cleared everything that we could out of our way and having moved our necessary gear into the room we got ready and entered “suited, booted and ready for war”.

We went into the room and found the walls were lathe and plaster: a process of finishing walls and ceilings used up until the late 1950s. This might make things a tad harder, but I had a sawsall with two batteries. I was good on that. There were no bees flying around inside the house but there were a lot of dead bees in the window sill to the left of where we were working.

IMG_0491

There are bees in that wall. We had no idea how many. 

The first thing I did was experimentally drive a nail puller into the wall above my head to see how sturdy it all was. The nail puller drove into the wall but the wall seemed fairly sturdy. So I found and marked the spot inside the was about where the bees were coming in and out outside then I started preparing the sawzall to do a little work when I noticed that I now had bees flying around my head.


So where did they come from? I looked around the room then Connie pointed up. My knock with the nail puller had been a bit more productive than I thought. Bees were pouring out of the hole I made and were not the least bit amused.

So it begins.