Repurposing on the Homestead

Y’all know I like junk, and I’m all about using what I have to make do.

Well, ever since we moved here four years ago (after I recovered from my accident), I’ve wanted a spot out in the detached garage to work on repurposing projects that were either too big, or too dirty to bring into the house.  At the same time, I had an idea for creating a table that would rotate, using some stuff we had out in the barn.

Well, about a month ago, we finally got the garage cleaned out enough for me to have my spot.  Since then, had been been moving stuff out there, and realized again, that I really needed a table. From the other times Ed and I (and Number One Son) had discussed it, I also knew that I needed a piece of plywood to join the two pieces from the barn. Extra plywood is not in the budget right now.

Well, a couple days ago, I was doing something totally unrelated in the house (I don’t even remember what it was), when suddenly, I remembered I had a piece of plywood that would probably work. To be honest, when something hits me like that, I’m not taking credit. That has to be the Lord.   Anyway, I used to do cake decorating many years ago, and I used pieces of plywood as supports for larger cakes. I knew I still had one left, I just had to remember where I put it. Thankfully, it didn’t take long to find, and I showed it to Ed to see if he thought it would work. He did.

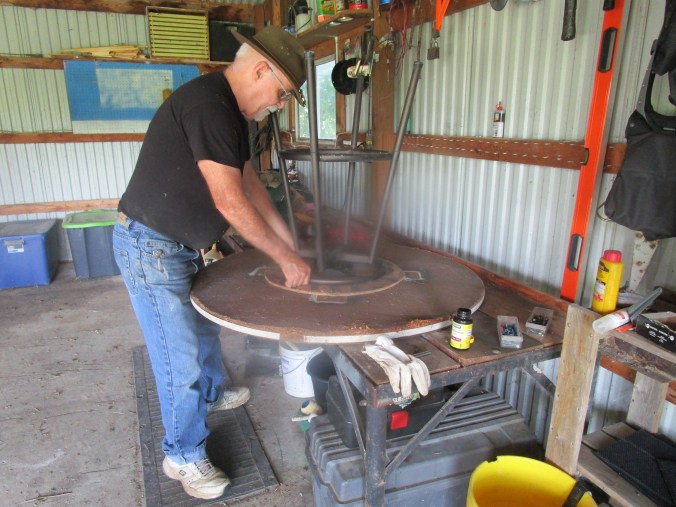
I think it was later that day that he and I went to the barn to gather the other materials. One was a round table top, and the other was the base from a swivel bar stool.  The table top was from a bunch of stuff that was given away after a yard sale. The bar stool base was here when we moved in.

Anyway, putting the whole thing together took about 15 minutes and didn’t cost us anything. We already had the necessary screws too.  I should say that the table top is actually particle board, so I don’t expect it to last forever, but it will do for what I need for now, and I’m thankful for it.

IMG_0777

Ed attaching the plywood to the table top

Looking at what remains of stenciled lettering on the plywood that I used for a cake base, I remembered where it came from. It’s from a sign that was made for a cub scouting event when my boys were in cub scouts, so it’s probably about twenty-two years old.  I got the board not too long after that. I stopped doing cakes like that about 19 years ago. Yeah, I don’t throw much away.

IMG_0776

close up of the plywood

Here is a picture of the bar stool base. You’ll notice the bee hive supers in the back ground. Ed had painted them and they were drying.  Further back in the picture are some old computers that Bam Bam is taking apart.  I’ll probably get whats left when he gets what he wants out of  them.

IMG_0778

bar stool base

There are holes in the base for screwing on the seat that will work perfectly for screwing it onto the table.

IMG_0779

See the holes at the ends of the cross bars?

IMG_0780

attaching the base. Notice the vitamin bottle on the work bench next to the table top? Those are great for keeping small screws.

IMG_0783

All done!

I have to tell you that I kept wondering about the pictures I was taking in the garage. It seemed like they were a little out of focus, or light was coming from someplace that I wasn’t accounting for. However, after taking pictures this morning, I realized what it was. There was something on the lens (Duh). Probably honey from the pictures I took out at the hives last week.

Here’s a picture of the table that I took this morning. I’ve been using it for about a week now.  It’s all ready for the next repurposing project!

IMG_0790

Ready to play!

Next week, Ed will bring you more about our bees. We should have our honey harvest done by then too. We’re also working on posts about the chickens and their new coop, and I’m working on some stuff for the “homestead kitchen”.

Come back and see us!

Connie

Proper Pallet Preparation (I could not resist)

You see them all the time. People building three story homes complete with in ground pool, billiard room, three car garage and tennis court that are built entirely out of pallets. You see the shelves, beds, fences, dining room tables, circular stairways and scale models of Old Ironsides all built with pallets and the question that is at the very head of most all slippery slopes comes niggling into your mind.

How hard could it be anyway?

Alexander, before he was the great, Cole Younger riding through North Field the first time, and Eve staring at the first Golden Delicious all ask themselves: how hard could it be anyway?

The question really was only a matter of idle curiosity until it met opportunity. The manager of the local Sprouts market offered me as many pallets as I cared to carry off. In two trips, I carried off a half dozen conventional pallets and one shelf like pallet that is now supporting Connie’s outdoor flowers that are wintering in our living room.

This is the shelf like pallet I found and, with no alteration, now sits in the Living Room for Connie's flowers

This is the shelf like pallet I found and, with no alteration, now sits in the Living Room for Connie’s flowers

I am still working on the cold frame and I decide I am going to disassemble a pallet to provide the wood I need for that. I have the pallets. I have a claw hammer and a nail puller, so what could go wrong? Find below the lessons learned from my first pallet disassembling:

Pallets before

Pallets before

Pallets after

Pallets after

1. No, I did not impale myself on a nail, but I did decide after looking at the pallets themselves that anyone doing this might want to know the date of his or her last tetanus shot. Mine was two years ago, when I did step on a nail at the old house, and woke up some six hours later with an infected foot. Note: nurse friendly will ask you one time when you had your last tetanus shot. If you say you do not know, start pulling down your trousers: here it comes.
2. Pallets are made to carry heavy loads being lifted with a pallet jack or forklift. They are designed to take a lot of abuse. Pallets are generally assembled with nail guns by workers who do not scrimp on the nails. Some pallets only have real nails in three of the boards, one on each end and one in the middle. The rest of the boards are attached with staples. The good news is the stapled boards are easier to pull; the bad news is that the nail guy, feeling cheated, uses more and longer nails.
3. So I go to work on my first pallet. So as not to leave you in horrible suspense, I did get enough wood to do what I wanted to do on the cold frame. The rest of the story is that it was hard.
4. It took hours to pull the pallet apart; I broke and rendered useless almost half of the boards on the pallet. Okay, useless is an over statement. I burn wood in my den so they are not useless but you get my point.

Disassembling five more pallets that represented 20 to 25 man hours of labor to produce an equal number of usable boards and kindling, did not look like such a good idea. What did all these guys who built covered bridges with pallet lumber know that I did not?

Next, I bought a full sized pry bar at the local farm store and worked on the next pallet with it. The results were only marginally better, and my bad shoulder was fast catching up with my worse shoulder in the pain department. I needed to do something else.

While we are still sad that the Library at Alexandria was burned, we do have the modern equivalent at our disposal. Google led me to You Tube. If you need to perform a kitchen table heart transplant, You Tube has a video for it. On You Tube I found a number of videos on the subject of pallet disassembly. My method incorporated the theory seen in this one.

I did not use a brick or a concrete block because I did not have them. I did have a number of the 4 X 4 inch blocks used in building pallets (I had just taken two apart). I had a small piece of 2 X 4 inch wood that I could attach to the other block (God bless duct tape), and extend it to half a foot. Then I used another of the 4 X 4 blocks and my four pound hammer.

IMG_1344

My basic pallet busting set-up. That and a pair of good durable work gloves.

I would set the 6 inch block under one of the boards near the place it is nailed or, better yet, stapled in, then I would put the other block on the board next to it to protect it from damage and I would hit that 4 inch block with my 4 pound hammer. After I had loosened that end, I would move to the middle and repeat the process. The last attached point was fairly easy to pry loose.

This is what happens when you do it right.

This is what happens when you do it right.

This is your set up. Note please, you will loose board even doing this. Wood is soft, nails and hammers are hard.

This is your set up. Note please, you will lose boards even doing this. Wood is soft, nails and hammers are hard.

IMG_1349

When you are doing the center go to the far side of the center support so your force is against the nails not the board. It cost me another board to learn that, you get it for free.

Using this method I took two pallets apart in a little under an hour, saved more than ¾ of the wood and could walk and function when I was done. All told, a vast improvement.

another view of a good set up.

another view of a good set up.

So now I am becoming a fairly adept pallet disassembler. The next trick is going to be actually building something out of pallets. Let’s see how that works out.

For those of you who noticed, yes it is raining in that picture and no, I am not that invested in pallet busting that I do it in the rain. Connie read this and said she would not understand without pictures. And I am always one for clarity.

May God Bless,

EdIMG_1354

Run, Run, Run!

Seems like all we did this week was run.

We made two 100 mile round trips to Liberty. and one 140 mile round trip to Independence this week, for doctor’s appointments and other personal business. Needless to say, we didn’t get much done on the homestead.

However, we did find a supplier for free wood pallets and other cool stuff from a store in Liberty. Look what we brought home yesterday!

wood frame with pallets in the background.

wood frame with pallets in the background.

Since we still don’t have the cold frame finished, Ed is thinking about using part of one of the pallets to frame the windows. Lord willing, his next two days off (Monday and Tuesday), will be “stay at home and catch up on projects” days.

Even with all the running, we did manage to get some school done. Most of what we did this week was literature. Since she was having to do a lot of sitting and waiting, I made her take books with her. She was not happy, but she did it. Today we started some Shakespeare, as well as reading “Rime of the Ancient Mariner” . Next week will have some “catch up on school” days as well.

The days that Ed worked, I got a few projects finished. I got some goldenrod picked and then I hung all my herbs out in the garage to dry.

goldenrod

goldenrod

drying herbs

drying herbs

I started drying them this way a few years ago, when we lived in Independence. I had a bumper crop of herbs and needed to get them all harvested before a forecasted frost. I crammed everything I could get into paper grocery sacks and stuck them on a shelf in the back of the house. Time got away from me and I didn’t get anything done with them. A few months later, I opened the bags, expecting to find rotted plant matter. What I found was perfectly dried herbs. I’ve been drying them that way ever since. The challenge this year was finding a place to hang the bags. I thought about the basement, but its too damp. I finally settled on the garage. I would have suspended them from the rafters, but I didn’t have any way to reach that high.

I also finished my first fall decorating project.

maple syrup bottle candle holders

maple syrup bottle candle holders

It’s the same concept as the blue ones I did awhile back. These are maple syrup bottles. I coated the inside with a shade of acryllic paint called “nutmeg”. Since the little handles are solid glass, I covered them with hemp rope. The leaves on the front are real maple leaves from the trees in our front yard. I coated them in about a ton of Mod Podge, to make them stay on. Then I tied on the raffia bows. I think they turned out well. The candles were too big for the bottles, so I had to whittle them down a little to make them fit. I guess that is as good a reason as any for learning to make my own candles!

Of course, on the days that Ed worked, we still had school, and Katherine still had to read. Here she is reading Les Miserables. Bookworm is reading along.

Kat and Bookworm reading Le Mis

Kat and Bookworm reading Le Mis

Ed is working on a series of posts about our critters, but I have to say something about Bookworm here. She is Captain’s daughter, from her first and only litter. At our last house, she practically lived outside. Now, she won’t go out unless we make her, and then she climbs the front door screen, yelling at us to let her back in. She divides her time between Katherine’s room and the tables in front of the picture window in the front room. I’m not sure what she was  thinking here. Maybe she thought she looked better in the pot than the avocado tree did.  That tree is tougher than it looks. It stood right back up when I made Bookworm move.

Bookworm in the avocado pot

Bookworm in the avocado pot

Our weather has been typical for Missouri fall. Two temperate days, one hot day, and then a “but I don’t want to turn on the furnace yet” day, and then back to a temperate day. We are getting very close to our average first frost dates, so I would really like to get some things finished outside soon. I also need to bring in some potted plants and herbs from the front yard. Then I’ll have to work on some interior lighting.

Hope everyone has a great evening!

Connie

Writing 101 Day 3: Treasure

On Day three of Writing 101, we were given a list of words and told to choose one. I chose the word “treasure”.

The expression, “One man’s trash is another man’s treasure” has been around in one form or another for a long time, probably because of the truth of the concept. It basically means that what one person finds useless, another might find valuable.

I like junk. If I see something “free” on the side of the road, I have to at least slow down and take a closer look. I have done some excavating in the old burn pile on our place, and found quite a few treasures. When he found a small, old tractor or lawn mower tire in one of the junk piles left on the place, my son told Ed, “You know, Mom is going to want this.” He was right, and I think I have an idea of what to do with it. I’ll share it with you when it’s finished. I keep tin cans, toilet paper tubes, glass containers, bottle caps and whatever else I think might be useful. I think I probably told you about the time I picked up a used windshield wiper turned it at an angle and told Ed; “Look honey, it’s an eyebrow!” He just calmly said, “No baby, it’s a windshield wiper.” Its taken some time, but he is starting to come around. Here are some pictures of some of my repurposed junk.

We found this in the side of the road a few years ago.

We found this in the side of the road a few years ago.

same dresser  painted and decorated with ribbon and scrapbook paper

same dresser painted and decorated with ribbon and scrapbook paper. The bottom drawer needed some work, so Ed has it in the garage

rub made from old sheets

rug made from old sheets

tin man, dog and flower

tin man, dog and flower

God tends to favor one man’s trash too. The scripture is full of examples of the Lord choosing the most unlikely, least qualified individual to serve His purposes. Jesus himself was the “stone the builders rejected” who became “the cornerstone”(Psalm 118:22, Matt 21:42, Eph 2:20, 1 Pet 2:6). I take great comfort in knowing that God sees the hidden beauty, the buried treasure in us; just like I see in a old piece of junk along the side of the road.

Connie

Cleaning Up

There were going to be pictures with this post, honestly there were, but by the time I realized I hadn’t taken them, it was dark. “That’s ok, “ I thought, I’ll just take them in the morning, and post then. It sounds like a great idea, except that it is raining buckets. So, forgive me for the lack of pictures, I’ll post some when the rain stops.

Saturday, I decided that the house and yard needed some serious attention so every thing else could wait.

Katherine and I painted our yard art additions, until we ran out of paint. I have two old tires and two wooden bushel baskets with the bottoms gone. I painted them and put the baskets inside the tires. We also painted an old bicycle. I’m thinking about turning the basket/tire combinations into fairy gardens. I was going to put the bicycle out with the red feather morning glory, but the ground isn’t level enough to support it.

My little tin man lost and arm, so he’ll need surgery soon. I need to build another one too. Our former pastor from our old church asked me if I would build one and donate it for the Buckner Mayor’s Christmas Tree auction. I told him I would, so I need to get on it.

Back to the house: The second task was Katherine’s room. Organization is not one of her strengths. It’s really not one of mine either, but I’ve taught myself as I’ve grown older. She just needs to figure out what works for her. To help her not be so overwhelmed, we took a lot of stuff out of her room. She has her furniture (although I took a small table and plastic drawers out), and the stuff she uses every day. Of course, we left the books on the bookshelves, and the knickknacks that are on the recessed shelves, because they aren’t going anywhere. They just keep the Beta company. We dusted, emptied out drawers full of stuff that she had forgotten she even had. She likes the openness of the room, and she also likes the “ambiance” (her word, not mine) that comes from having a thicker curtain hung that keeps more sunlight out. And what is this new curtain, you ask? It’s the top sheet from her Teenage Mutant Ninja Turtles sheet set. She never uses it and it always ends up on the floor, so I thought, “Why not?”

She has her laptop, her Kindle, her violin, her bow, and her drawing supplies. When she decides she wants something else, we will come up with a plan for storing it so that she can keep track of it. The down side to all this is that all the stuff we took out of her room is in my living room, along with all the stuff I pulled out of my craft closets. There is just a path through the living room. It will probably be like that until I can get the Shelf Elf (Ed) to build me some shelves. I would do it myself, but that is a skill I don’t have.

Ed will be off Monday and Tuesday, and has promised me a blog post, so I hope you will hear from him soon. In the meanwhile, I’m taking a couple more classes from Blogging U, starting on Monday, with Writing 101. Some of what you see over the next few weeks may seem like it doesn’t belong on a homesteading blog, but please bear with me, and go along on this little side trip. In the meanwhile, lift me up to the Lord for really good time management skills, because I am going to need it!

Oh! One more thing. Ed and I finished the Whole 30. I lost 8 lbs, and Ed lost 20! The weight loss is exciting, but the way we both feel is the true reward! We’re going to stay with it.

Connie