Endangered Skills Number 5: Orienteering Part 2

IMG_0044

This is the map of our local area. The big city of Braymer, Missouri is the pinkish spot in the upper right (north east) quadrant.

When I was promoted into the ranks of a Non-commissioned Officer in our United States Army these many years ago, this newly formed Buck Sergeant was taken aside and taught the first absolute of being a good Sergeant. A crusty Platoon Sergeant with a marked Spanish accent said, “Sergeant, you will NEVER let a 2d Lieutenant hold the map and the compass at the same time.”

Land Navigation, as the Military calls it, is a vital skill and it starts with understanding what you are dealing with. I am not going to have the time or the space to teach you how to navigate using a map and a compass, the best I can do is list the skills necessary to navigate with a map and a compass. Perhaps I can also highlight some common errors people make.

For more in-depth information I am going to refer you to Field Manual (FM) 3-25.26 Map Reading and Land Navigation.

Also, for good cheap or even free Topographical Maps I suggest you look up the United States Dept of the Interior Geological Survey. These are the kind of maps that, when I say “map” I am talking about.

1. A compass is a device that points to magnetic north. For the purpose of using a map there are THREE different norths:

a. Magnetic north is governed by the magnetic pull of the earth that draws your compass needle towards it. It is located generally around Hudson Bay but it moves.

b. True north is the actual point of north. The Top of the World if you will.

c. Grid north is where your map’s grid lines point to as north.

At the bottom of any good map there should be some kind of declination diagram or at least a pointer that points to true north. On short trips the difference between true north and magnetic north should not cause you much error. In Missouri the declination is 1degree 6 minutes east which I determined by visiting this site.  This means that, to adjust to true north I am going to have to subtract 1.6 from my compass heading.

Are we confused yet?

Let’s talk about compasses. I prefer the Lensatic Compass that is issued by the military, because it is accurate and designed for use in the worst kind of conditions. However, any decent magnetic compass will do as long as you know how to use it.

lensatic compass

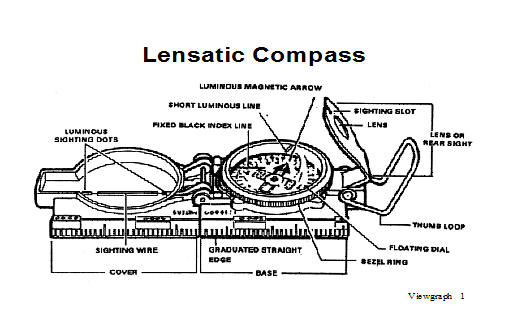
U S Army Illustration

The compass on your watch band, in your fancy survival watch, the handle of your knife or the one you got out of a cereal box is probably OK for determining general direction, and it is better than nothing in a pinch, but I would not like to walk twenty-five miles using that type of compass to choose my direction.

2. Lets talk about maps for a minute. For my purposes, I am talking about a to scale two dimensional representation of a three dimensional surface of the earth. (I can remember that definition from twenty years ago but I cannot remember where I left my hat. Sigh)

That kind of map is a topographic map which shows elevations, vegetation, bodies of water, and man made objects. Anything less is going to give you problems choosing a good route.

So we have our map in our hands and our compass hanging by a lanyard around our neck. Lets talk about one of the major errors we all tend to make when trying to read a map. I named this error “The North Seeking Jeep”.

People have a tendency to believe that once they lay the map out, the top of the map (representing north) is oriented to the north. So people sitting in their jeeps (yes, I mean officers), have a tendency to believe whatever direction their jeep is facing is north. It probably isn’t.

To orient your map you can use your compass or you can use major linear terrain features you can see (roads, creeks, mountain ranges, power lines etc). The best way is with your compass. Factoring in your declination laying your compass along a north-south grid line and turn the map with the compass until the compass point to north. Until you know how your map relates to the cardinal directions, you better get used to long useless walks. By the way, Connie pointed out some people might not know what I mean by “cardinal directions”. Due North, South, East and West are your cardinal directions. Red birds have nothing to do with it.

There will be symbols and colors on your map. If you are using a Topographic Map from the Geological Survey folks, the symbols and colors are largely standard, but on any map they should be listed at the bottom of the map. Also you will find your contour intervals (the distance in elevation between contour lines) and your scale.

So we have our map. We have read it so we know what the different symbols and colors mean. We know the scale of the map and we have oriented it using our compass, after accounting for the declination, and we are ready to go.

Hold on a second. How far are you going to go, and how will you know how far you have gone? You can use the features on your map to estimate how far you have gone, but sometimes there is not that much difference in terrain features over an extended distance; deserts and plains for example. Now you need a method of measuring how far you have gone, and to do that you need to know your pace count.

In a military patrol two men are assigned to keep up with their pace. Generally they use a piece of para chord tied to their web gear in which they tie a knot every 100 meters. You may not need to use this technique where you are orienteering, but when you do need to use it, you need it badly.

So mark off a hundred meters over terrain, not down a flat highway, and find out your pace count. A true pace is a full two steps. If you step off with your left foot the second time your left foot hits the ground is one pace. My step is generally around 30 inches, and my pace count always came out to about 65 paces per 100 meters.

Oh, one last thing you will need to know. How to find places on your map using the grid system on the map and, in a pinch, the longitude and latitude system. I could try to explain it to you here, but I doubt either one of us have the patience for that. Get the FM I suggested or any other good orienteering\book. Get a map, get a good compass, and prepare to get lost.

Of course you are going to get lost. We all get lost. Orienteering is being lost, interspersed with occasional clarity as to where you are. Kind of like life.

Endangered Skills Number 5: Orienteering Part 1

The story goes that a young reporter found the great surveyor of virgin territory, Daniel Boone, in his retirement in Missouri and asked to interview him. Mr. Boone was never shy about talking about his past, so he agreed. One of the first questions the reporter asked was whether Mr. Boone had ever been lost.

Daniel was said to have considered the question and answered. “No, I ain’t never been lost, I have been confused for a month or two sometimes, but I ain’t never been lost.”

I guess it is all in how you look at it. In the military, where I learned Orienteering, the catch phrase was “miss-oriented”. We never got lost, we were only miss-oriented. Yeah, right.

Whatever name you want to call it, being lost is never any fun, and our ancestors had to deal with the possibility of it because, as Daniel Boone would testify, getting miss-oriented could lead to several months of confusion.

I was raised in the mountains, within walking distance of the Cherokee reservation and the Great Smokey Mountain National Park. It is still a part of the country where a boy could walk off in the woods and not be able to find his way back. My Grandfather taught my brother and I a simple truism that works very well in the eastern Appalachians, and has some application to all mountains.

If you find yourself lost, go down hill until you find water, and downstream until you find people.

With that simple formula, at the age of ten, I was not the least bit afraid to walk Little Mountain, Eagle’s Nest, all around the Balsam Gap, Plott Creek, the Little Pigeon river, and points all around there. I probably took a year or two off my poor grandmother’s life but it was fun for me.

I am going to divide this post into two parts:

Orienteering using maps and compasses.

Orienteering using nature. How our ancestors found their way around before cartography and compasses became common, or in places where maps were simply not yet made.

Lets first look at some not so true truisms:

The sun rises in the east and sets in the west. Unless you are on the equator, NO. For us folks in the northern hemisphere, the sun rises in the SOUTH EAST and sets in the SOUTH WEST. If you are trying to arrive at a point Due East or West of you, then the problem with navigating by the sun should be obvious. There are ways to adjust for that and we will look at a couple shortly.

Moss grows on the south side of the tree. NO. Moss grows on the most protected side of the tree. Remember, I am a mountain boy. Most time moss grows on the up hill side of the tree in the mountains, and that is normally east or west. While moss growth can be a good indicator of direction, it is not completely accurate.

Water flows south. NO Water flows down hill. Whether that is north, south, east or west is another question.

For basic survival skills in the woods, I recommend to you FM 21-76 U.S. Army Survival Manual. Chapter 11 or 18 (depending on your version,) discusses Field Expedient methods of direction finding. I intend to talk about three of these methods, two using shadows and one using the stars.

For simplicity sake, I am going to stick to how this works in the NORTHERN temperate zone. (between 23.4 degrees and 66.6 degrees north). That would be where most of us live. If you are in the southern hemisphere either seek information elsewhere or contact me and I will get it for you.

The situation: You are lost and you have no idea where the cardinal directions are.

The first method I will discuss, is refereed to as the Shadow Tip Method. It is relatively quick and extremely accurate.

1. Find a spot clear of brush where the sun is shinning and a stick approximately a meter (a yard) long.

2. Drive the stick into the ground and mark the end of the first shadow with a stone. This point is ALWAYS the west end of the line you are going to create.

3. Wait fifteen or twenty minutes. If you are really lost, relax for awhile. Running your body dry on adrenaline is not helpful. When the time has passed, the shadow should have moved a short distance. Mark this movement and then draw a line from the first mark through the second mark, extending the line for some distance.

4. Stand with your left foot on your first mark and your right foot on your second. If you are above the equator you are facing in a northerly direction you left is west, your right is east and south is behind you.

shadow tip

FM 21-76

The second method I will discuss is the watch method. This method requires an analog watch. A very good reason to carry my pocket watch to the woods with me. It also uses shadow so we are going to start in a clear place where the sun is shinning and we, again, are going to place or stick in the ground.

1. Place a small stick in the ground that cast a definitive shadow.

2. Place your watch on the ground with the hour hand along the shadow.

3. Find the midway point between 12 O’clock and the hour hand and draw a line through this point. This line is the north-south line with north being in the direction the line is going through the watch. The other directions will be just as we said before. I have used this method while on the move, just to determine if I am going in the right general direction. Just point your hour hand at the sun and look at a point half way between that and 12 going clockwise. That will be generally north.

clock

FM 22-76

Lets talk about the stars now. Again I am staying with the Northern Hemisphere. South of the equator you would be looking for the southern cross but where most of us live navigating by the stars is done by the north star. The rest of the stars in the northern heavens revolve around the North Star.

The North Star (Polaris) is the tail end star in the Little Dipper (Ursa Minor) but that is often hard to find. Look for the Big Dipper (Ursa Major) and on the dipper end you will find two stars that act as pointers. Draw an imaginary line out from these stars and you will find another constellation called Cassiopeia or the Lazy W. Between the two the most prominent stars, you will see is the North Star.

finding north star

FM 21-76


In this day and age of GPS, and even the simpler compass and map, it is hard to believe that our ancestors crossed this country with no better guide than the North Star isn’t it? In the old wagon trains, the lead wagon was always set with its wagon tongue facing the North Star so that the next morning there would be no doubt which way they were to go.

Most times, in those cases where we are lost, it is better to conserve your energy, seek some shelter if necessary and wait for help. But while you are waiting you might want to orient yourself, because sometimes it is going to be necessary to walk out.

When that happens, you are going to need to know something about getting yourself oriented to your environment, so you can make reasonable decisions about where and how to go. What I have shown you here is introductory. It is a sampling of ways to find your direction that have been used for years.

Writing 101: Wrapping Up

I got way behind on the Writing 101 assignments, so I’m going to try to kill a few birds with one stone.

Day 16 involved taking cues from the stats of our blog. Well, I don’t think we’ve been at this long enough to have any useful stats. The facilitators of the class prepared for that possibility and offered some alternatives, but none of those really appealed to me either.

One suggestion was
“Overnight, you discover you’ve gained 50,000 blog subscribers. What would you write for your next post?”

One of Ed’s favorite jokes is about a little boy who is struggling with math. His teacher decides to try a different approach.

“Johnny?” she says, “You have three dollars in your right pocket, and two dollars in your left pocket. What do you have?” Johnny thinks a minute and says “Someone else’s pants on?”

My response to gaining 50,000 subscribers overnight would be similar: “Who hacked my blog?

Day 17 challenged us to mine our own material, with an alternate suggestion to consider “things we leave behind”

I looked over my blog notes, and did find something. There was a link to making extracts without alcohol. So here is your head’s up. Next week, I will post about creating mint extract using fresh mint and food grade glycerin.

On Day 18 we were to let a map be our muse….Are we there yet?

Traveling with children is always an experience, and they are sure to make what would other wise be a dull trip memorable. James was 18 months old when we left Kansas City on Thanksgiving evening after having dinner with my Mom’s family. We were heading for Atlanta to see my dad. My grandma always made the most wonderful home made noodles for Thanksgiving dinner (my sister makes them now). James ate a LOT of noodles. A few hours later, they all came back up. That is all I remember about that trip.

When Bam Bam was five, we moved back to Missouri from Kentucky. Mom and my sister had driven down to help us with the move, and the boys and I were riding with them in Mom’s car. We had gone about ten miles, when Bam Bam asked “how much farther?” Have you ever tried to explain a twelve-hour drive to a five year old? That was a fun trip too.

When I was a kid, we traveled broke a lot. That meant there was no money for anything besides gas, and sometimes barely enough for that. One such time we had gone to my grandparents in Oklahoma. I think it was some kind of emergency trip. My sister was maybe two, so I was about ten.

Anyway, Grandma had sent some sandwiches with us for the trip home. I don’t know what the meat was, but I do know that we couldn’t chew it. My sister would not give up. She kept gnawing on that piece of meat. We had stopped at a road side park to eat and she took it with her on the slide and on the swing. That’s when she dropped it in the dirt. Of course, Mom wouldn’t let her have it back, and she started to scream. Seems to me like she screamed the rest of the trip. Yeah, another fun one.

Katherine has never had the experience of an extended road trip.

On Day 19, we were to “feature a guest” or “publish a roundup of great reads”. I have come across some great bloggers in this class, and wish I had time to read everything. I know some of them have the same “complaint”.  Anyway, I do want to share one that I just love.

This is the first post in a series of three from Casey. Be sure to read the other two posts. Together they tell a great story.

For Day 20, we were encouraged to look toward the future and think about what is next.

This one is easy. I want to get Ed back into posting his thoughts at least once a week. (He’s got something in the works right now, and I’m hoping to post it tomorrow.) Fall is my favorite time of year, and it’s very busy on the homestead. So what is really next for Old Folks at Homestead? More of what we’ve been doing. I need to gather some golden rod, finish the cold frame, get my spinach planted, and experiment with planting things now for spring harvest.

I’ll have more “pictures of the week”and I’ll be keeping y’all updated on the chickens, dogs, cats and whatever other critters wind up on the homestead. We’ll talk about homeschooling, repurposing, and eating real food. We’ll share our faith, our thoughts our hopes, and more than a few laughs.

Thanks for sticking with us.

Connie