Things To DO When It’s Too Cold To Do Things: Fixin’ My Guitar

I have a fairly low tolerance for self-pity, especially when it is my own self-pity. So, other than feeling sorry for myself about the loss of the bees what have I been up to this winter? For one thing I have been teaching myself to fix my musical instruments with a long term plan.

At some point I intend to fully rebuild this old Kay that I have stuck back in a closet. The model number indicates it was built sometime in the late fifties to early sixties. It is a solid guitar but it seems to have suffered some mistreatment. So expect to see some posts on this one down the road a bit.

What started me on wanting to fix guitars? Money and time mostly. A while back, with much groaning and gnashing of teeth, I replaced the saddle on my thirty-six year old Applause guitar.

Applause

This time started when my Epiphone strap pen and pick-up jack were loose. I could drive to Independence and back home, and that equals about three hours time and about ten bucks worth of gas. The estimate from the Luther for tightening the strap pen and pick-up jack was about thirty-five bucks.

What I ended up doing was watch two videos on You Tube; about half an hour, no charge. Then I bought two quarter inch dowels I need to do the repair. Repair time was about an hour and cost was under two bucks, and I got an extra dowel. (Old Army thing, if you have to have one take two with you.) The boost to self-confidence and renewed interest in DIY stuff? Priceless.

So lets look at what is involved:

Step one: Get the instrument seated on a firm surface that will allow you to work in good light and not scratch or dent the instrument. My Hummingbird is a little over two years old and has only got one memory mark on it. I try.

What you see is nothing but a side work table to my desk with two towels. It works just great.

Step two: Firmly insert your dowel into the pick up jack. The first time I tried to fix this I supposed that I could reach in when I changed strings and just tighten her right up. Yes siree Bob, just tighten that rascal right up. Note to self, the human arm don’t bend that-a-way. So you seat that dowel in the pickup hole firmly.

IMG_1014

Make certain the dowel is firmly in place. You do not want to be fishing for this thing.


Step three: Take loose the cover that also is your strap pin. Move it back on the dowel.


Another note: I do not remove any of the hardware from the dowel. I leave it there until it is time to put the thing back together because I am not fond of the where is the INSERT NAME OF LOST TINY THING YOU CANNOT DO WITHOUT HERE game.

Step four: Push the dowel up into the guitar until you are under the sound hole. You will be able to see and reach the hole amplifier jack assembly. You do not have to remove the strings.

IMG_1007

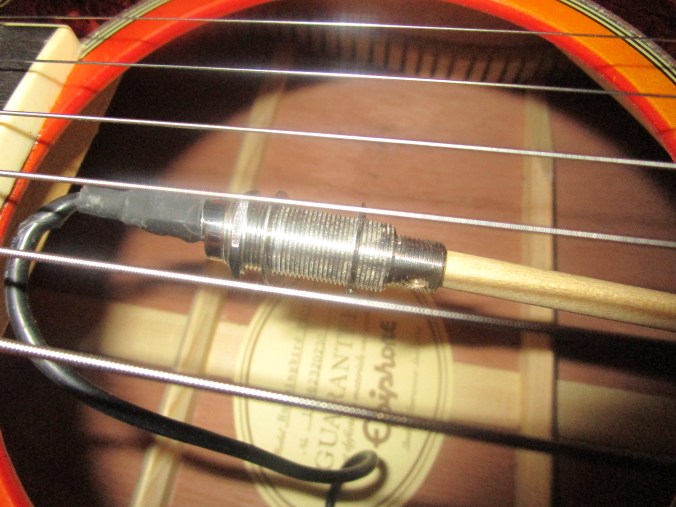
Step five: You will see another small nut on the jack and two more washers. How much you need to tighten the nut depends on how loose the jack and pin assembly were. I wish I could be more specific but it will be a matter of trial and error. When you think you have it right, carefully pull the dowel with your amplifier jack assembly on it out of the hole at the end of the guitar. Once again, you do not want to loose that jack inside the guitar or you will have to go fetch it.

IMG_0999

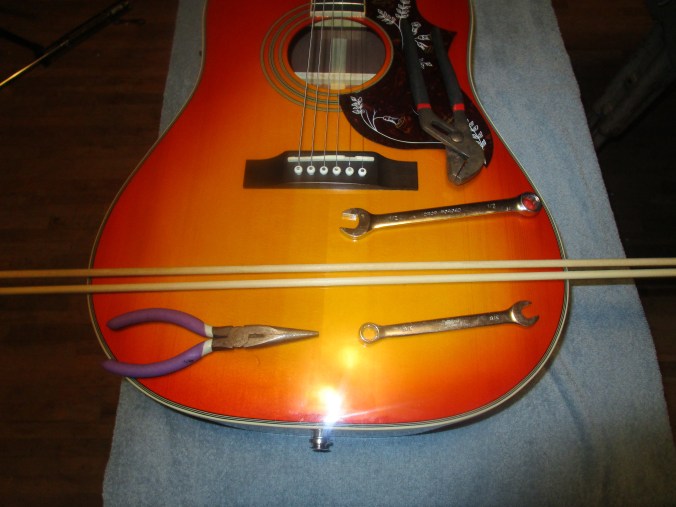
So there it is, the strap pin is tightened and seated. The jack is flush with the outside of the strap pin. On top is all the tools I got out of which I used the needle nose pliers, the 3/8 wrench and one dowel.

What we are trying to do is tighten that nut until the whole assembly firmly seats into the hole prepared for it with the portion that the strap pen screws on sticking out and the rest even. You have finished you hope.

Is the whole assembly tight when wiggled? When you look at the assembly is the tip of the pick up jack even with the strap pen that closes and covers the assembly? It should not be recessed or protruding.

Of course if you have access to an amplifier,  you will pull out your chord and test it even if you do not normally play over amp. Because why? Because Mommy potty trained you with a ball bat just like me.

Happy playing pickers.

Endangered Skill 7: Making Your Own Entertainment, Part 1, Musical Instruments

When I did the original post for Eight Endangered Skills, I listed making and playing your own instruments, and then said it also reminded me of making toys. The point is that our ancestors knew how to entertain themselves, and they learned to have fun with whatever was available. That may be the skill that is truly endangered.  Today’s post will focus on music, but we’ll look at toys and other forms of home made entertainment in a future post.

Music is universal. Yes, styles vary by era, by culture and by personal taste, but it is there nevertheless.  People have made and played their own instruments as far back as we can remember. In the Bible, musicians are first mentioned in Genesis chapter 4. “ His brother’s name was Jubal; he was the father of all those who play the lyre and pipe” (vs 22).  The one instrument we all carry with us, whether we use it or not, is the human voice.

I was hoping Ed would write this post, since he did most of the work,  but his job schedule has changed a little, and we are still adjusting. When we started working on this series last summer, I found this article from Mother Earth News.  I knew that we had to try and build a gut bucket, aka washtub bass.  We would need a wash tub, something for the neck, something for the string (a plastic coated cable was recommended),  and a way to attach the string to the wash tub.

I will admit that I kind of struggled with giving up my old washtub, but I have been promised a new one. Ed found an old closet rod for the neck and asked if I had any tin cans that we could cut the bottoms out of for washers. Was he kidding? Of course I did!  We did have to go buy eye bolts and a small cable.  After we got home, we both saw a cable we could have used, and I am quite sure eye bolts will turn up too.  We learned a long time ago, that the best way to find something you know you have is to go buy a new one.   Once we got started, the whole process took less than an hour.   I have to tell you that Ed had a great time making this.

Chicken Girl was the photographer today.

IMG_0614

hole drilled in the bottom of the tub

IMG_0619

Inside of the tub with the “washer” and the nut end of the eyebolt

IMG_0616

Eye bolt on the outside of the tub

IMG_0622

attaching a ring to the eyebolt

IMG_0613

A notch cut in one end of the rod

IMG_0598

A hold drilled in the other end

IMG_0620

cutting the hook off the cable 

IMG_0625

The cable attached. Notice the notch on the rod hooked on the rim of the tub

IMG_0628

attaching the other end of the cable to the other end of the rod

IMG_0634

The finished product

Most home made instruments don’t need anywhere near that kind of time or construction. Have you ever given a small child a pot and a spoon? Yep, instant drum!  Different surfaces and different materials make different sounds and lend themselves to all sorts of “instruments”.  Dried beans in a tin can?   Maracas!  A comb and tissue paper? A kazoo!  Glasses filled with different levels of water? Chimes! The possibilities are probably endless, limited only by imagination. The best thing is that you don’t have to be a “musician”. You can just have fun with it.

You can buy specially made musical spoons today, they didn’t start out that way.   Ed actually got some pretty good rhythm going for awhile with two spoons from our kitchen.

Musical saws can also be purchased, but you don’t need a special one to learn. You do however, need something to use for a bow.  Chicken girl was greatly concerned when I experimented with an old hand saw and her violin bow.  I did manage to get a little sound, but probably needed a more flexible saw. The bow was no worse for the wear.
This is a basic tutorial on playing the saw, and Wikihow has instructions for making a bow here.

IMG_0637 (2)

Well, something like that anyway

Several years ago, Ed and I started collecting primitive instruments.  We used to play music at a couple different places and we liked to hand them out to whoever was there listening, and invite them to play along. We never got too many takers, but we did have fun, which was the whole point.

In addition to our usual  instruments (guitar, mandolin, harmonica, etc), we have a washboard, a jug, a cowbell, and now, a gut bucket!  IMG_0638

Do you play an instrument? Have you ever made your own?

Connie

Writing 101: Things I Like

Today’s assignment for Writing 101 was:

“Today, write your own list on one of these topics:

  • Things I Like
  • Things I’ve Learned
  • Things I Wish”

So here is my list of things I like, in no particular order:

Having all my children home together.

Music of all kinds, but particularly those pieces that, without words, stir something so deep that they bring tears to my eyes, and I don’t even know why.

Singing

Playing piano and guitar (I don’t do either one very well, but I’m learning)

Jammin’ with family and friends.

Big dogs.

Strong black coffee

Reading

Books. This is not the same as reading. I love physical books, especially the old ones. I love how they feel in my hands. I love sitting amongst bookshelves, taking in the smell of old books. There is something comforting about that to me.

Junk, aka Antiques. Discussing the subject with my dad a few weeks back, he said, according to my step-mother, “If it’s in the house, its an antique; if its outside, it’s junk. We know where I got my love for junk.

Repurposing said junk. I love picking up something that most would consider trash, and turning it into something useful, beautiful, or just plain fun.

Musical Theater, particularly from the 1930s and 40s. Love Jeanette MacDonald and Nelson Eddy!

Being able to go outside my house, pick something growing out there, whether planted by me or by God, come back in and use it for food or medicine.

Hanging out with God’s people.

Thunderstorms

Exploring book stores and junk stores with Ed.

Wood stoves

Baking, although that’s kind of on the shelf now. I have promised my daughter that I will bring it back for the holidays.

Beading.

Puzzles

Connie